A lot can be said about how to measure loudspeaker Thiele/Small parameters. There are different methods of measurement and they are not all equally good (this will not be discussed here). Due to drive unit non-linearities, there is not one final set of parameters for any drive unit. Several of the parameters are a function of cone/voice coil excursion, hence they depend on the input voltage/current level. At SB Acoustics we use the delta mass method (as opposed to delta compliance). We use a constant voltage source and a 150 Ω resistor in series with the drive unit. Hence, this is neither a constant voltage nor a constant current measurement (the value of the resistor is not nearly large enough to approximate constant current, which is not the intention either).
Prior to measuring T/S parameters, the drive unit should be broken in – for two reasons. If the suspension of the drive unit is not broken in, its compliance will slightly increase during the measurement, thus affecting/distorting the results. Furthermore, eventually the drive unit will end up being broken in (it actually does not take that long), which is why it is recommended to use T/S parameters that apply for a broken-in drive unit when calculating box volumes and tuning frequencies. The free air resonance frequency typically drops about 10-15% during break-in, as the suspension compliance increases. This directly affects the Q-factors and the equivalent volume.
To break in a drive unit, you are going to need a sine wave or a noise generator with adjustable output voltage (the former is recommendable) and a power amplifier. Using a sine wave generator, adjust the frequency somewhere below the expected free air resonance frequency of the drive unit (typically about 80% of this value). Slowly turn up the voltage until the suspension reaches maximum displacement. Keep it below clipping level. Usually you can hear when the suspension goes into clipping mode - there will be some kind of mechanical noise. Adjust the voltage slightly below this level. During the process of breaking in the drive unit, it might be necessary to turn down the voltage a little to keep it from clipping, as the suspension softens. It needs to run for about ten minutes. Before measuring, let the drive unit cool to ambient temperature.
You are now ready to measure the T/S parameters. First measure the voice coil DC resistance, Re. It is recommended to use a 4-wire ohm-meter (which is quite expensive), in which case the lead wire resistance is eliminated. You can also use a really good multimeter, but be advised that many low- and mid-priced multimeters will not do the job very well. It needs to have a low resistance range (like 0-20 Ω). It is advisable not to use the lead wires that come with the multimeter when using the lower range, as the quality of these wires is often too poor. Accuracy should be better than ±0.1 Ω, which requires offset correction. Resistance is dependent on temperature. A copper voice coil that measures 6.2 Ω at 25 °C will only measure 6.07 Ω at 20 °C. SB Acoustics specifies voice coil DCresistance at 25 °C and our tolerance is ±0.15 Ω or ±2% (larger value applies).
In order to avoid unwanted mechanical resonances that may affect the results, the drive unit should be held firmly in free air in a vertical position. Make sure not to seal any vent in the pole piece. Therefore, do not place the drive unit on the floor (which would also make it resonate at some frequency). Furthermore, the drive unit should not be placed near a reflective surface, such as a wall, as this will change the radiation impedance – and we want this to be a free air measurement.
The next step is to measure the impedance curve (i.e. modulus of the impedance). To do this, you need some kind of measurement system. At SB Acoustics we use a stepped sine sweep with narrow frequency spacing (at least 1/24 oct. is recommended). High frequency resolution is crucial in order to be able to accurately determine the free air resonance frequency and the maximum impedance at this frequency – especially with high-Qms drive units. If it looks like the top of the impedance peak has been chopped off, you need more measurement points. The voltage that should be applied to the terminals of the drive unit depends on its size/type. For a typical mid-woofer, the voltage should be about 1 V (rms) at the resonance frequency.
Picture 1: The impedance-frequency curve
Notice, only SI-units are used in the following equations. Results may be converted into other units afterwards. Determine the free air resonance frequency, fs [Hz]. Determine the maximum impedance level (at the free air resonance frequency), Zmax [Ω].
Calculate the impedance level, Z1,2 [Ω], at the side frequencies.
Z1,2 = sqrt(Re * Zmax)
Determine the side frequencies (these are not the quadrant frequencies!), f1 and f2 [Hz]. Verify:
fs = sqrt(f1*f2)
Deviation from the measured value indicates drive unit non-linearities (or an inaccurate measurement). Calculate the mechanical Q-factor, Qms.
Qms = (fs/(f2 - f1))*sqrt(R0)
Where:
R0 = Zmax/Re
Calculate the electrical Q-factor, Qes:
Qes = Qms/(R0 - 1)
Calculate the total Q-factor, Qts:
Qts = Qms*Qes/(Qms + Qes)
Now attach an accurately weighed amount of sticky material (e.g. plasticine), ∆m [kg], to the center part of the cone or to the dust cap (be careful not to damage the dust cap). Do not be tempted to use small magnets on either side of the cone as added mass, as this will affect the measurement results. Add about 70% of the expected moving mass of the drive unit. Make sure that the entire added mass sticks to the cone, so that no part of it can vibrate freely. Notice that removal of sticky material may cause certain types of paper cones to delaminate in the top layers.
Once again measure the impedance curve - do not adjust the voltage (or current). Determine the new/shifted resonance frequency, fo [Hz]. Calculate the moving mass (incl. air), mms [kg].
mms = ∆m/((fs/f0)^2 - 1)
Calculate the mechanical (loss) resistance, Rms [kg/s]:
Rms = 2πfs*mms/Qms
Calculate the force factor, BL [Tm]:
BL = sqrt((Zmax - Re)*Rms)
Calculate the compliance of the suspension, Cms [m/N]:
Cms = 1/(2πfs)^2 * mms
Measure the piston diameter (as shown on the Picture 2 below), Dd [m].
Picture 2: Piston diameter
Calculate the piston area, Sd [m2]:
Sd = π * (Dd/2)^2
The effective piston area is approximately 95% of the above calculated value in most cases. Hence, a correction should be made. A correction must also be made if the drive unit uses a porous/vented dust cap or a phase plug, obviously. Calculate the equivalent volume, Vas [m3]:
Vas = Cms * ρ * c^2 * Sd^2
Where:
ρ is the density of air, ρ = 1.2 kg/m3 (20 °C, 50% RH, 1 atm);
c is the speed of sound in air, c = 344 m/s (20 °C, 50% RH).
Determine the minimum impedance level above the resonance frequency, Zmin [Ω]. Determine the frequency, f3 [Hz], at which the impedance level is 3 dB above Zmin (3 dB is a factor of √2).
Calculate the voice coil inductance, Le [H]. An empirical equation is used, as a voice coil sitting in a motor system does not behave like a true inductor. This model for voice coil inductance is rather simple – better lumped models have been made.
Le = ((Re*20*10^3)/2πf3 + 0.5)*10^-3/20
The set of Thiele/Small parameters now is complete.
Source: SB Acoustics.
Showing posts with label Audio. Show all posts
Thiele-Small Parameters
In the early seventies, several technical papers were presented to the AES (Audio Engineering Society) that resulted in the development of what we know today as ‘Thiele-Small Parameters’. These papers were authored by A.N.Thiele and Richard H. Small. Thiele was the senior engineer of design and development for the Australian Broadcasting Commission and was responsible at the time for the Federal Engineering Laboratory, as well as for analyzing the design of equipment and systems for sound and vision broadcasting. Small was, at the time, a Commonwealth Post-graduate Research Student in the School of Electrical Engineering at the University of Sydney.
This parameter is the free-air resonant frequency of a speaker. It is the frequency where the driver moves with minimal effort. In other words, it is the point at which the weight of the moving parts of the speaker becomes balanced with the force of the speaker suspension when in motion. If you’ve ever seen a piece of string start humming uncontrollably in the wind, you have seen the effect of reaching a resonant frequency. It is important to know this information so that you can prevent your enclosure from ‘ringing’. If you tap a speaker (or any object for that matter), it will make a sound, which has the same frequency as its resonant frequency. With a loudspeaker, the mass of the moving parts, and the stiffness of the suspension (surround and spider) are the key elements that affect the resonant frequency. When the driver reaches the resonance frequency, its response starts to roll off. As a general rule of thumb, a lower Fs indicates a woofer that would be better for low-frequency reproduction than a woofer with a higher Fs. This is not always the case though, because other parameters affect the ultimate performance as well. The lower the Fs , the better. A woofer with Fs of 50 Hz will not play well at 40 Hz, and a woofer with Fs of 30 Hz will play well at 40 Hz. Woofers can have resonant frequencies of 20 Hz or even lower. While you can’t hear those frequencies, you can feel them. Fs for midrange drivers and tweeters is irrelevant, as they will probably play above that frequency anyway.
The Re parameter is the DC resistance of the driver measured with an ohm meter and it is often referred to as the ‘DCR’. This measurement will almost always be less than the driver’s nominal impedance. Consumers sometimes get concerned the Re is less than the published impedance and fear that amplifiers will be overloaded. Due to the fact that the inductance of a speaker rises with a rise in frequency, it is unlikely that the amplifier will often see the DC resistance as its load.
This is the voice coil inductance measured in millihenries (mH). The industry standard is to measure inductance at 1 kHz. As frequencies get higher there will be a rise in impedance above Re. This is because the voice coil is acting as an inductor. Consequently, the impedance of a speaker is not a fixed resistance, but can be represented as a curve that changes as the input frequency changes. Maximum impedance (Zmax) occurs at Fs. When current is applied to the voice coil, at the same time, an additional current flow is created, in the opposite direction of the current flow, called back EMF, which is short for electromotive force. As current flows through the voice coil, it moves it into a certain direction, and back EMF tries to move it in the opposite direction. That is why the impedance spikes at resonance frequency. At that frequency the speaker easily reaches high excursions and back EMF is working hard to pull it back. Inductance causes the impedance to rise as the frequency goes up. Large Le values will translate into poor high frequency response. To improve the high frequency response, a technique called shorting ring or Faraday loop can be used, but that's another subject for discussion.
The impedance is the AC resistance, which is not a fixed value because the speaker is moving and the impedance varies with frequency. Impedance will have a high value at resonance frequency. Usually the manufacturers quote one number, like 4, 6 or 8 ohms. A 8 ohm speaker can have impedance vary from 6 ohms to 25 ohms or more, but for the most frequencies it will be around 8 ohms.
The Bl parameter is product of B, which is the flux density, and l, which is the length of the voice coil. In other words, this is a measurement of the motor strength of a speaker. Think of this as how good a weightlifter the transducer is. A measured mass is applied to the cone forcing it back while the current required for the motor to force the mass back is measured. The formula is mass in grams divided by the current in amperes. A higher Bl will translate in higher efficiency. Of course, the efficiency is determined by lots of factors, so a higher Bl doesn’t necessarily mean a higher SPL. To get the bigger picture, the bigger magnet and bigger coil equals bigger motor. Neodymium magnets are stronger than normal ferrite magnets and they don’t need to be as large. The strength of the motor is in direct correlation with the size and the weight of the cone, size of the coil, size of the magnet, size of the basket. If we modify Bl, that will change a lot of things. A high Bl speaker will be suitable for loaded horn applications. Also, a high Bl will translate into better transients (sudden sounds). The motor has enough power to move the cone with a fast reaction time. Bl is in accordance with the size of the speaker, so it’s hard to give an estimate of which is high and which is low. Bl of around 10 is pretty average.
Qms, Qes and Qts are measurements related to the control of a transducer’s suspension when it reaches the resonant frequency (Fs). The suspension must prevent any lateral motion that might allow the voice coil and pole to touch (this would destroy the loudspeaker). The suspension must also act like a shock absorber.
Qts of values of 0.6 or higher, will demand a very large box. The predefined bass-reflex alignments can be used for Qts values lower than 0.7. Higher Qes values suggests that the woofer is more suitable for sealed enclosures, while lower values recommends the bass-reflex. As a general guideline, Qts of 0.4 or below indicates a transducer well suited to a vented enclosure. Qts between 0.4 and 0.7 indicates suitability for a sealed enclosure. Qts of 0.7 or above indicates suitability for free-air or infinite baffle applications. However, there are exceptions.
Cms is the compliance of the speaker. Cms is measured in meters per Newton. Cms is the force exerted by the mechanical suspension of the speaker. It is simply a measurement of its stiffness. The suspension of the speaker (the surround and the spider) has a certain stiffness. If the suspension is stiff, the driver is not compliant. So, the easy it is to move the speaker, the more compliant it is. Considering stiffness (Cms), in conjunction with the Q parameters gives rise to the kind of subjective decisions made by car manufacturers when tuning cars between comfort to carry the president and precision to go racing. Think of the peaks and valleys of audio signals like a road surface then consider that the ideal speaker suspension is like car suspension that can traverse the rockiest terrain with race-car precision and sensitivity at the speed of a fighter plane. It’s quite a challenge because focusing on any one discipline tends to have a detrimental effect on the others.
Compliance affects the resonant frequency. A higher Cms will yield a lower Fs. If Cms goes up => Fs goes down. Like, for example, a ball on a spring. The stiffness of the spring determines the compliance. If the spring is stiff, then it is less compliant and the ball will bounce at a higher frequency (short and fast bounces). If the spring is not stiff, or more compliant, the ball will make long bounces - reduced frequency.
Vas represents the volume of air that when compressed to one cubic meter exerts the same force as the compliance (Cms) of the suspension in a particular speaker. The air inside the cabinet has its own compliance. When you try to compress the air inside a box, you will encounter resistance. If the box is small, the air is harder to compress and therefore less compliant, and if the box is larger, the air is easier to compress, therefore more compliant. In conclusion, Vas describes the volume of the air inside the cabinet, where the compliance of the speaker matches the compliance of the air inside the box. Vas is one of the trickiest parameters to measure because air pressure changes relative to humidity and temperature — a precisely controlled lab environment is essential.
Short for Maximum Linear Excursion. Speaker output becomes non-linear when the voice coil begins to leave the magnetic gap. Although suspensions can create non-linearity in output, the point at which the number of turns in the gap (see BL) begins to decrease is when distortion starts to increase. Xmax is the maximum distance a speaker can travel without distorting. The coil has a certain length and moves up and down inside the magnetic gap of the motor. If the coil travels too far and leaves the magnetic gap, the speaker will distort, as the magnet has a reduced control on the voice coil. Don’t confuse this Thiele/Small parameter with Xmech.
Xmax = ((height of the voice coil) – (height of the magnetic gap)) / 2
Is the maximum distance a speaker can travel without damaging the driver. When a driver is exceeding the quoted Xmax, distortion is introduced into the sound. However, if the driver exceeds the quoted Xmech, the mechanical limits of the driver are reached and damage can occur to the driver. When the driver travels forward, it will stretch the surround until it can’t move forward. It looks and sounds disturbing. On the way back, the voice coil will hit the back plate of the magnet and will sound like loud bangs/knocks. The exceeded Xmech of the speaker can damage it.
The effective area of the cone or the actual surface area of the cone, normally given in square cm. This is important, if you want to reach high pressure levels (Xmax also). You are probably wandering why 2 speakers of the same quoted dimensions have different Sd ? It is because only half of the surround is considered cone area, so larger surrounds will yield a smaller Sd.
This parameter is the Peak Diaphragm Displacement Volume — in other words the volume of air the cone will move. It is calculated by multipying Xmax (Voice Coil Overhang of the driver) by Sd (Surface area of the cone).
This parameter is the combination of the weight of the cone assembly plus the ‘driver radiation mass load’. The weight of the cone assembly is easy: it’s just the sum of the weight of the cone assembly components. The driver radiation mass load is the confusing part. In simple terminology, it is the weight of the air (the amount calculated in Vd) that the cone will have to push.
This measurement is calculated by dividing Fs by Qes. The EBP figure is used in many enclosure design formulas to determine if a speaker is more suitable for a closed or vented design. An EBP close to 100 usually indicates a speaker that is best suited for a vented enclosure. On the contrary, an EBP closer to 50 usually indicates a speaker best suited for a closed box design. This is merely a starting point. Many well-designed systems have violated this rule of thumb! Qts should also be considered.
This is the total moving mass. If you place on a scale the cone, the coil, half of the surround and half of the spider, you got yourself the value of Mmd. If you add to this equation the weight of the air in front of the speaker, then you will get the Mms value. When the speaker is moving, the pocket of air directly in front of it, will move with the cone. This air has its own mass and has to be accounted for, when calculating the total moving mass (Mms). If Mms goes up, the Fs goes down (imagine a ball hanging on a spring. If the ball is heavier, the ball will bounce at a lower frequency). If Mms goes up, the efficiency goes down (more amplifier power is needed to push the cone).
SPL stands for sound pressure level. The higher the number, the higher the efficiency. Good SPL rating is around 88 – 90 db, at 1 W / 1 m. This means that the manufacturer picks a certain frequency (depending on the type of the driver : woofer, midrange, tweeter), places a microphone at 1 meter from the speaker, and plays a 1 W tone at that frequency. How many decibels the microphone picks up is the actual SPL. The higher the efficiency, the better. This takes impedance into account. At 8 ohms there is no difference. So 90 db measured at 2.83 V / 1 m are the same as 90 db measured at 1 W / 1 m. But if the speaker is 4 ohms, 90 db measured at 2.83 V / 1 m is equal to 90 db measured at 2 W / 1 m, which is equivalent to 87 db 1 W / 1m. For a 2 ohm speaker 90 db 2.83 V / 1 m is equivalent to 84 db 1 W / 1 m and so on.
This is the frequency range for which Eminence feels the transducer will prove useful. Manufacturers use different techniques for determining ‘Usable Frequency Range’. Most methods are recognized as acceptable in the industry, but can arrive at different results. Technically, many loudspeakers are used to produce frequencies in ranges where they would theoretically be of little use. As frequencies increase, the off-axis coverage of a transducer decreases relative to its diameter. At a certain point, the coverage becomes ‘beamy’ or narrow like the beam of a flashlight. If you’ve ever stood in front of a guitar amplifier or speaker cabinet, then moved slightly to one side or the other and noticed a different sound, you have experienced this phenomenon and are now aware of why it occurs. Clearly, most two-way enclosures ignore the theory and still perform quite well. The same is true for many guitar amplifiers, but it is useful to know at what point you can expect a compromise in coverage.
This specification is very important to transducer selection. Obviously, you need to choose a loudspeaker that is capable of handling the input power you are going to provide. By the same token, you can destroy a loudspeaker by using too little power. The ideal situation is to choose a loudspeaker that has the capability of handling more power than you can provide lending some headroom and insurance against thermal failure. To use an automobile as an analogy; you would not buy a car that could only go 55mph if that were the speed you always intended to drive. Generally speaking, the number one contributor to a transducer’s power rating is its ability to release thermal energy. This is affected by several design choices, but most notably voice coil size, magnet size, venting, and the adhesives used in voice coil construction. Larger coil and magnet sizes provide more area for heat to dissipate, while venting allows thermal energy to escape and cooler air to enter the motor structure. Equally important is the ability of the voice coil to handle thermal energy. Eminence is renowned for its use of proprietary adhesives and components that maximize the voice coil’s ability to handle extreme temperatures. Mechanical factors must also be considered when determining power handling. A transducer might be able to handle 1,000W from a thermal perspective, but would fail long before that level was reached from a mechanical issue such as the coil hitting the back plate, the coil coming out of the gap, the cone buckling from too much outward movement, or the spider bottoming on the top plate. The most common cause of such a failure would be asking the speaker to produce more low frequencies than it could mechanically produce at the rated power. Be sure to consider the suggested usable frequency range and the Xlim parameter in conjunction with the power rating to avoid such failures. The Eminence power rating is derived using an EIA 426A noise source and test standard. All tests are conducted for eight hours in a free-air, non-temperature controlled environment. Eminence tests samples from each of three different production runs and each sample must pass a test exceeding the rated power by 50 to 100W. The Eminence music program is double that of our standard Watts rating.
This data represents one of the most useful specifications published for any transducer. It is a representation of the efficiency and volume you can expect from a device relative to the input power. Loudspeaker manufacturers follow different rules when obtaining this information — there is not an exact standard accepted by the industry. As a result, it is often the case that loudspeaker buyers are unable to compare ‘apples to apples’ when looking at the sensitivities of different manufacturers’ products. Eminence sensitivities are expressed as the average output across the usable frequency when applying 1W/1M into the nominal impedance. ie: 2.83V/8 ohms, 4V/16 ohms.
Fs = 50*Pi*sqrt(1/(Cms*Mms))
Units of measurement:
Fs in Hz;
Cms in mm/N (millimeters/newton);
Mms in g (grams).
Altering the compliance or the moving mass will directly affect the resonant frequency:
>> Increasing Cms will decrease Fs. This can be done by making the suspension looser.
>> Increasing Mms will decrease Fs. This can be done by choosing a heavier material for the cone.
Vas = 0.0014 * Sd^2 * Cms
Units of measurement:
Vas in l (liters);
Sd in cm^2;
Cms in mm/N.
Increasing the size of the speaker or the compliance (looser suspension) will increase Vas as a result.
Res = Z0 – Re
Qms = Res / (BL^2 * Cms * 6.283 * Fs)
Qes = Re / (BL^2 * Cms * 6.283 * Fs)
Units of measurement:
Res is calculated by subtracting the voice coil resistance (Re) from the impedance peak measured at resonance (Z0) – all measured in ohms;
BL in Tm (Tesla * meters);
Cms in m/N (meters/newton);
Fs in Hz.
Qts = (Qes * Qms) / (Qes + Qms)
Calculate Qts by adding Qes and Qms like resistances in parallel.
Conclusions: Increasing BL, Cms or Fs will reduce Qes and Qms. Increasing Re will result in increasing Qes. This can be done by adding a series resistor, but this will also affect the efficiency of the driver in a negative way. A higher impedance peak at resonance will translate in a higher Qms.
Mmr – the air mass load – the air in front of the cone that follows the cone motion;
Mmd – the assembly mass – the mass of all the components that move (cone, voice coil, half of the surround, half of the spider).
Here are the equations for calculating the moving mass:
Mmr = 0.000575 * Sd^1.5
Mms = Mmd + Mmr
Units of measurement: the masses are in grams and Sd is in cm^2.
Clearly the air mass load is highly dependent on the size of the speaker. The moving mass is the sum of the assembly mass and the air mass load.
Le = 1.592 * 10^-5 * (R10k – Re^2)^1/2
Where R10k is the resistance at 10 kHz measured in ohms, and Re is the DC resistance measured in ohms.
n0 = (9.7822 * 10^-10 * Vas * Fs^3) / Qes
n0 above is a ratio, not a percentage. To make it a percentage multiply by 100;
Vas is in liters;
Fs in Hz;
SPL @ 1W/1m = 112.2 + 10 * log(n0)
The SPL rating is in direct proportion to n0. Important to note is that the efficiency coefficient (n0) is highly dependent to the resonant frequency, because it’s at the power of 3. In conclusion, tweeters and mid-range drivers will be more efficient versus subwoofers.
Fs (Hz)
This parameter is the free-air resonant frequency of a speaker. It is the frequency where the driver moves with minimal effort. In other words, it is the point at which the weight of the moving parts of the speaker becomes balanced with the force of the speaker suspension when in motion. If you’ve ever seen a piece of string start humming uncontrollably in the wind, you have seen the effect of reaching a resonant frequency. It is important to know this information so that you can prevent your enclosure from ‘ringing’. If you tap a speaker (or any object for that matter), it will make a sound, which has the same frequency as its resonant frequency. With a loudspeaker, the mass of the moving parts, and the stiffness of the suspension (surround and spider) are the key elements that affect the resonant frequency. When the driver reaches the resonance frequency, its response starts to roll off. As a general rule of thumb, a lower Fs indicates a woofer that would be better for low-frequency reproduction than a woofer with a higher Fs. This is not always the case though, because other parameters affect the ultimate performance as well. The lower the Fs , the better. A woofer with Fs of 50 Hz will not play well at 40 Hz, and a woofer with Fs of 30 Hz will play well at 40 Hz. Woofers can have resonant frequencies of 20 Hz or even lower. While you can’t hear those frequencies, you can feel them. Fs for midrange drivers and tweeters is irrelevant, as they will probably play above that frequency anyway.
Re (Ohms)
The Re parameter is the DC resistance of the driver measured with an ohm meter and it is often referred to as the ‘DCR’. This measurement will almost always be less than the driver’s nominal impedance. Consumers sometimes get concerned the Re is less than the published impedance and fear that amplifiers will be overloaded. Due to the fact that the inductance of a speaker rises with a rise in frequency, it is unlikely that the amplifier will often see the DC resistance as its load.
Le (mH)
This is the voice coil inductance measured in millihenries (mH). The industry standard is to measure inductance at 1 kHz. As frequencies get higher there will be a rise in impedance above Re. This is because the voice coil is acting as an inductor. Consequently, the impedance of a speaker is not a fixed resistance, but can be represented as a curve that changes as the input frequency changes. Maximum impedance (Zmax) occurs at Fs. When current is applied to the voice coil, at the same time, an additional current flow is created, in the opposite direction of the current flow, called back EMF, which is short for electromotive force. As current flows through the voice coil, it moves it into a certain direction, and back EMF tries to move it in the opposite direction. That is why the impedance spikes at resonance frequency. At that frequency the speaker easily reaches high excursions and back EMF is working hard to pull it back. Inductance causes the impedance to rise as the frequency goes up. Large Le values will translate into poor high frequency response. To improve the high frequency response, a technique called shorting ring or Faraday loop can be used, but that's another subject for discussion.
Impedance (Ohms)
The impedance is the AC resistance, which is not a fixed value because the speaker is moving and the impedance varies with frequency. Impedance will have a high value at resonance frequency. Usually the manufacturers quote one number, like 4, 6 or 8 ohms. A 8 ohm speaker can have impedance vary from 6 ohms to 25 ohms or more, but for the most frequencies it will be around 8 ohms.
Bl (Tm)
The Bl parameter is product of B, which is the flux density, and l, which is the length of the voice coil. In other words, this is a measurement of the motor strength of a speaker. Think of this as how good a weightlifter the transducer is. A measured mass is applied to the cone forcing it back while the current required for the motor to force the mass back is measured. The formula is mass in grams divided by the current in amperes. A higher Bl will translate in higher efficiency. Of course, the efficiency is determined by lots of factors, so a higher Bl doesn’t necessarily mean a higher SPL. To get the bigger picture, the bigger magnet and bigger coil equals bigger motor. Neodymium magnets are stronger than normal ferrite magnets and they don’t need to be as large. The strength of the motor is in direct correlation with the size and the weight of the cone, size of the coil, size of the magnet, size of the basket. If we modify Bl, that will change a lot of things. A high Bl speaker will be suitable for loaded horn applications. Also, a high Bl will translate into better transients (sudden sounds). The motor has enough power to move the cone with a fast reaction time. Bl is in accordance with the size of the speaker, so it’s hard to give an estimate of which is high and which is low. Bl of around 10 is pretty average.
Q Parameters
Qms, Qes and Qts are measurements related to the control of a transducer’s suspension when it reaches the resonant frequency (Fs). The suspension must prevent any lateral motion that might allow the voice coil and pole to touch (this would destroy the loudspeaker). The suspension must also act like a shock absorber.
Q (Unitless)
Also called quality factor or damping factor. The damping of the speaker, is a characteristic that helps the speaker to resume its rest state. Without adequate damping, a speaker would move uncontrollably at resonance frequency. Q actually stands for quality factor and is the inverse of damping. As damping goes up, Q goes down, but it is widely accepted that Q is a measurement of damping. There are 3 types of speaker damping: mechanical, electrical and pneumatic.Qms
Qms is the mechanical Q or the damping made by the suspension of the driver: the surround and the spider of the speaker. Qms is a measurement of the control coming from the speaker’s mechanical suspension system (the surround and spider). View these components like springs.Qes
Qes is the electrical Q or the damping made by the coil – magnet assembly. Qes is a measurement of the control coming from the speaker’s electrical suspension system (the voice coil and magnet). Opposing forces from the mechanical and electrical suspensions act to absorb the shock. When the coil moves through the magnetic field, it generates a current which opposes this motion (hence the electrical damping). Another factor which contributes to the electrical damping is the amplifier. This depends on the particular amplifier. The Qes provided by the speaker manufacturer does not include amplifier damping.Qts
Also called total Q – The damping made by Qms and Qes combined. Qts is called the ‘Total Q’ of the driver and is derived from an equation where Qes is multiplied by Qms and the result is divided by the sum of the same: 1/Qts = 1/Qms + 1/Qes. This is the Q we should look for if we plan to use it in the free air.Qtc
This is the pneumatic damping. This parameter exists only when there is a box in the equation. Depending on the size of the box, the air inside it will act like a spring and contribute to the dampening of the speaker. You can say that Qtc = Qts + Q of the box. This is the Q we should look for if we plan to use a sealed box.Qts of values of 0.6 or higher, will demand a very large box. The predefined bass-reflex alignments can be used for Qts values lower than 0.7. Higher Qes values suggests that the woofer is more suitable for sealed enclosures, while lower values recommends the bass-reflex. As a general guideline, Qts of 0.4 or below indicates a transducer well suited to a vented enclosure. Qts between 0.4 and 0.7 indicates suitability for a sealed enclosure. Qts of 0.7 or above indicates suitability for free-air or infinite baffle applications. However, there are exceptions.
Cms (m/N)
Cms is the compliance of the speaker. Cms is measured in meters per Newton. Cms is the force exerted by the mechanical suspension of the speaker. It is simply a measurement of its stiffness. The suspension of the speaker (the surround and the spider) has a certain stiffness. If the suspension is stiff, the driver is not compliant. So, the easy it is to move the speaker, the more compliant it is. Considering stiffness (Cms), in conjunction with the Q parameters gives rise to the kind of subjective decisions made by car manufacturers when tuning cars between comfort to carry the president and precision to go racing. Think of the peaks and valleys of audio signals like a road surface then consider that the ideal speaker suspension is like car suspension that can traverse the rockiest terrain with race-car precision and sensitivity at the speed of a fighter plane. It’s quite a challenge because focusing on any one discipline tends to have a detrimental effect on the others.
Compliance affects the resonant frequency. A higher Cms will yield a lower Fs. If Cms goes up => Fs goes down. Like, for example, a ball on a spring. The stiffness of the spring determines the compliance. If the spring is stiff, then it is less compliant and the ball will bounce at a higher frequency (short and fast bounces). If the spring is not stiff, or more compliant, the ball will make long bounces - reduced frequency.
Vas (l)
Vas represents the volume of air that when compressed to one cubic meter exerts the same force as the compliance (Cms) of the suspension in a particular speaker. The air inside the cabinet has its own compliance. When you try to compress the air inside a box, you will encounter resistance. If the box is small, the air is harder to compress and therefore less compliant, and if the box is larger, the air is easier to compress, therefore more compliant. In conclusion, Vas describes the volume of the air inside the cabinet, where the compliance of the speaker matches the compliance of the air inside the box. Vas is one of the trickiest parameters to measure because air pressure changes relative to humidity and temperature — a precisely controlled lab environment is essential.
Xmax (mm)
Short for Maximum Linear Excursion. Speaker output becomes non-linear when the voice coil begins to leave the magnetic gap. Although suspensions can create non-linearity in output, the point at which the number of turns in the gap (see BL) begins to decrease is when distortion starts to increase. Xmax is the maximum distance a speaker can travel without distorting. The coil has a certain length and moves up and down inside the magnetic gap of the motor. If the coil travels too far and leaves the magnetic gap, the speaker will distort, as the magnet has a reduced control on the voice coil. Don’t confuse this Thiele/Small parameter with Xmech.
Xmax = ((height of the voice coil) – (height of the magnetic gap)) / 2
Xmech (mm)
Is the maximum distance a speaker can travel without damaging the driver. When a driver is exceeding the quoted Xmax, distortion is introduced into the sound. However, if the driver exceeds the quoted Xmech, the mechanical limits of the driver are reached and damage can occur to the driver. When the driver travels forward, it will stretch the surround until it can’t move forward. It looks and sounds disturbing. On the way back, the voice coil will hit the back plate of the magnet and will sound like loud bangs/knocks. The exceeded Xmech of the speaker can damage it.
Sd (m^2)
The effective area of the cone or the actual surface area of the cone, normally given in square cm. This is important, if you want to reach high pressure levels (Xmax also). You are probably wandering why 2 speakers of the same quoted dimensions have different Sd ? It is because only half of the surround is considered cone area, so larger surrounds will yield a smaller Sd.
Vd
This parameter is the Peak Diaphragm Displacement Volume — in other words the volume of air the cone will move. It is calculated by multipying Xmax (Voice Coil Overhang of the driver) by Sd (Surface area of the cone).
MMS
This parameter is the combination of the weight of the cone assembly plus the ‘driver radiation mass load’. The weight of the cone assembly is easy: it’s just the sum of the weight of the cone assembly components. The driver radiation mass load is the confusing part. In simple terminology, it is the weight of the air (the amount calculated in Vd) that the cone will have to push.
EBP
This measurement is calculated by dividing Fs by Qes. The EBP figure is used in many enclosure design formulas to determine if a speaker is more suitable for a closed or vented design. An EBP close to 100 usually indicates a speaker that is best suited for a vented enclosure. On the contrary, an EBP closer to 50 usually indicates a speaker best suited for a closed box design. This is merely a starting point. Many well-designed systems have violated this rule of thumb! Qts should also be considered.
Mms and Mmd (g)
This is the total moving mass. If you place on a scale the cone, the coil, half of the surround and half of the spider, you got yourself the value of Mmd. If you add to this equation the weight of the air in front of the speaker, then you will get the Mms value. When the speaker is moving, the pocket of air directly in front of it, will move with the cone. This air has its own mass and has to be accounted for, when calculating the total moving mass (Mms). If Mms goes up, the Fs goes down (imagine a ball hanging on a spring. If the ball is heavier, the ball will bounce at a lower frequency). If Mms goes up, the efficiency goes down (more amplifier power is needed to push the cone).
SPL (dB)
SPL stands for sound pressure level. The higher the number, the higher the efficiency. Good SPL rating is around 88 – 90 db, at 1 W / 1 m. This means that the manufacturer picks a certain frequency (depending on the type of the driver : woofer, midrange, tweeter), places a microphone at 1 meter from the speaker, and plays a 1 W tone at that frequency. How many decibels the microphone picks up is the actual SPL. The higher the efficiency, the better. This takes impedance into account. At 8 ohms there is no difference. So 90 db measured at 2.83 V / 1 m are the same as 90 db measured at 1 W / 1 m. But if the speaker is 4 ohms, 90 db measured at 2.83 V / 1 m is equal to 90 db measured at 2 W / 1 m, which is equivalent to 87 db 1 W / 1m. For a 2 ohm speaker 90 db 2.83 V / 1 m is equivalent to 84 db 1 W / 1 m and so on.
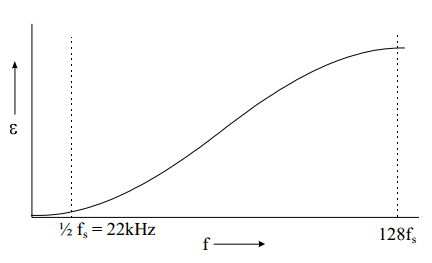
Usable frequency range
This is the frequency range for which Eminence feels the transducer will prove useful. Manufacturers use different techniques for determining ‘Usable Frequency Range’. Most methods are recognized as acceptable in the industry, but can arrive at different results. Technically, many loudspeakers are used to produce frequencies in ranges where they would theoretically be of little use. As frequencies increase, the off-axis coverage of a transducer decreases relative to its diameter. At a certain point, the coverage becomes ‘beamy’ or narrow like the beam of a flashlight. If you’ve ever stood in front of a guitar amplifier or speaker cabinet, then moved slightly to one side or the other and noticed a different sound, you have experienced this phenomenon and are now aware of why it occurs. Clearly, most two-way enclosures ignore the theory and still perform quite well. The same is true for many guitar amplifiers, but it is useful to know at what point you can expect a compromise in coverage.
Power handling
This specification is very important to transducer selection. Obviously, you need to choose a loudspeaker that is capable of handling the input power you are going to provide. By the same token, you can destroy a loudspeaker by using too little power. The ideal situation is to choose a loudspeaker that has the capability of handling more power than you can provide lending some headroom and insurance against thermal failure. To use an automobile as an analogy; you would not buy a car that could only go 55mph if that were the speed you always intended to drive. Generally speaking, the number one contributor to a transducer’s power rating is its ability to release thermal energy. This is affected by several design choices, but most notably voice coil size, magnet size, venting, and the adhesives used in voice coil construction. Larger coil and magnet sizes provide more area for heat to dissipate, while venting allows thermal energy to escape and cooler air to enter the motor structure. Equally important is the ability of the voice coil to handle thermal energy. Eminence is renowned for its use of proprietary adhesives and components that maximize the voice coil’s ability to handle extreme temperatures. Mechanical factors must also be considered when determining power handling. A transducer might be able to handle 1,000W from a thermal perspective, but would fail long before that level was reached from a mechanical issue such as the coil hitting the back plate, the coil coming out of the gap, the cone buckling from too much outward movement, or the spider bottoming on the top plate. The most common cause of such a failure would be asking the speaker to produce more low frequencies than it could mechanically produce at the rated power. Be sure to consider the suggested usable frequency range and the Xlim parameter in conjunction with the power rating to avoid such failures. The Eminence power rating is derived using an EIA 426A noise source and test standard. All tests are conducted for eight hours in a free-air, non-temperature controlled environment. Eminence tests samples from each of three different production runs and each sample must pass a test exceeding the rated power by 50 to 100W. The Eminence music program is double that of our standard Watts rating.
Sensitivity
This data represents one of the most useful specifications published for any transducer. It is a representation of the efficiency and volume you can expect from a device relative to the input power. Loudspeaker manufacturers follow different rules when obtaining this information — there is not an exact standard accepted by the industry. As a result, it is often the case that loudspeaker buyers are unable to compare ‘apples to apples’ when looking at the sensitivities of different manufacturers’ products. Eminence sensitivities are expressed as the average output across the usable frequency when applying 1W/1M into the nominal impedance. ie: 2.83V/8 ohms, 4V/16 ohms.
Formulas:
Fs – Resonant frequency
According to the ball hooked up to a spring analogy, the ball will bounce differently (frequency) depending on how heavy the ball is or how stiff the spring is. If the ball is heavy, it will take long bounces. Therefore, reduced frequency, as it takes longer to complete a cycle. However, if the spring is stiffer, it pulls the ball back faster. In conclusion, higher frequency. Since we’re talking about Thiele/Small parameters equations, here is the equation for the resonant frequency:Fs = 50*Pi*sqrt(1/(Cms*Mms))
Units of measurement:
Fs in Hz;
Cms in mm/N (millimeters/newton);
Mms in g (grams).
Altering the compliance or the moving mass will directly affect the resonant frequency:
>> Increasing Cms will decrease Fs. This can be done by making the suspension looser.
>> Increasing Mms will decrease Fs. This can be done by choosing a heavier material for the cone.
Vas – Equivalent compliance in liters
Vas expresses the compliance of the speaker in terms of volume. Imagine a syringe without the needle. Close up the nozzle with your finger. If you try to push the plunger, you will encounter resistance from the air trapped inside the tube. This amount of air has a certain compliance. If the syringe is bigger (higher volume of air), the air is easier to compress, therefore, higher compliance. Having said this analogy, Vas is the compliance of the speaker expressed in liters.Vas = 0.0014 * Sd^2 * Cms
Units of measurement:
Vas in l (liters);
Sd in cm^2;
Cms in mm/N.
Increasing the size of the speaker or the compliance (looser suspension) will increase Vas as a result.
Qes, Qms and Qts
These 3 Thiele/Small parameters equations have more to do with the interaction, rather than the calculation. To calculate them, you would use the impedance curve, rather than the following equations:Res = Z0 – Re
Qms = Res / (BL^2 * Cms * 6.283 * Fs)
Qes = Re / (BL^2 * Cms * 6.283 * Fs)
Units of measurement:
Res is calculated by subtracting the voice coil resistance (Re) from the impedance peak measured at resonance (Z0) – all measured in ohms;
BL in Tm (Tesla * meters);
Cms in m/N (meters/newton);
Fs in Hz.
Qts = (Qes * Qms) / (Qes + Qms)
Calculate Qts by adding Qes and Qms like resistances in parallel.
Conclusions: Increasing BL, Cms or Fs will reduce Qes and Qms. Increasing Re will result in increasing Qes. This can be done by adding a series resistor, but this will also affect the efficiency of the driver in a negative way. A higher impedance peak at resonance will translate in a higher Qms.
Mms – moving mass
This is one of the most obvious Thiele/Small parameters equations. First of all, let’s talk about the components of the moving mass:Mmr – the air mass load – the air in front of the cone that follows the cone motion;
Mmd – the assembly mass – the mass of all the components that move (cone, voice coil, half of the surround, half of the spider).
Here are the equations for calculating the moving mass:
Mmr = 0.000575 * Sd^1.5
Mms = Mmd + Mmr
Units of measurement: the masses are in grams and Sd is in cm^2.
Clearly the air mass load is highly dependent on the size of the speaker. The moving mass is the sum of the assembly mass and the air mass load.
Le – Inductance
Le is the voice coil inductance and it’s measured in millihenries (mH). The equation for the voice coil inductance is:Le = 1.592 * 10^-5 * (R10k – Re^2)^1/2
Where R10k is the resistance at 10 kHz measured in ohms, and Re is the DC resistance measured in ohms.
n0 and SPL rating – Efficiency
n0 is a percentage, showing how efficient the driver is at converting an electrical signal to an acoustical one. As a result, the bigger the number, the greater the reference sound pressure level.n0 = (9.7822 * 10^-10 * Vas * Fs^3) / Qes
n0 above is a ratio, not a percentage. To make it a percentage multiply by 100;
Vas is in liters;
Fs in Hz;
SPL @ 1W/1m = 112.2 + 10 * log(n0)
The SPL rating is in direct proportion to n0. Important to note is that the efficiency coefficient (n0) is highly dependent to the resonant frequency, because it’s at the power of 3. In conclusion, tweeters and mid-range drivers will be more efficient versus subwoofers.
Modulators and Feedback
There are numerous modulators, and here it is not objective to give an extensive overview, only the basic topologies are discussed.
PDM modulators
PDM modulators have resulted from the digital signal processing domain. In more and more equipment, the signal is available in digital form. For a switching amplifier it must be converted into a 1 bit signal at a high frequency. Sometimes, as with DSD audio data, this is even the native format. The output stage acts as a 1 bit D/A converter. Because the length of each bit is constant, and only the presence or non-presence of a bit is controlled, this is called Pulse Density Modulation (PDM). To convert a multi-bit signal to a 1-bit signal, oversampled noise shaping is used. Picture 1 shows a general noise shaper.
Picture 1: Noise shaper
The input signal Bin(z) has a larger number of bits than Bout(z). (When the input signal is analogue, a similar structure in the analogue domain constitutes a sigma-delta modulator). The block called "Quantizer" reduces the number of bits by simply passing only the most significant bits to Bout(z). The least significant bits, which are the error, are added to the input after passing through a transfer function J(z). It is easy to calculate Bout:
Bout(z) = Bin(z) - ε(z)(1 - J(z))
Suppose J(z) = z-1, one clock delay. The system is now a first-order noise shaper. Bin(z) is a 16 bit signal at 256fs and Bout is a 1 bit signal at 256fs. In that case, the quantizer transfers 1 bit to the output. The other 15 bits are the error signal. Bout equals:
Bout(z) = Bin(z) - ε(z)(1 - z^-1)
With z = e^( 2πj(f/256fs)), we see that for low frequencies (audio) the error in the output signal approaches zero. The error reaches a maximum for f = 128fs. See Picture 2.
Picture 2: Noise distribution as a function of frequency
Applying Bout to a 1 bit D/A converter and filtering above 20 kHz reconstructs the original signal. In the time domain such a noise shaper is a way to convert resolution in the amplitude domain to resolution in the time domain. It outputs bits at high speed in such a way that the average is the intended output (which has a higher amplitude resolution). This way it is also easy to see that although the D/A converter is only 1 bit, it should have a 16 bit accuracy.
To convert the audio signal to 256fs, an oversampling interpolating filter must proceed the noise shaper. A two times oversampling filter works as follows. Suppose the spectrum of the signal sampled at fs looks like Picture 3. This signal is converted to a sampling frequency of 2fs by inserting a sample of value zero after every original sample. See Picture 4. Because every sample is a Dirac pulse of proportional height, the frequency spectrum stays exactly the same.
Picture 3: Spectrum of the signal
Picture 4: Inserting zero samples
Next, the signal is applied to a digital filter at 2fs that filters out the middle replica, see Picture 5. After that, the frequency spectrum of the signal looks exactly like it has been sampled at 2fs. These techniques, oversampling interpolating filtering and noise shaping are essential for all digital PDM systems, although the exact realisation may vary.
Picture 5: Filtering out the middle replica
Assume, the 256 times oversampling for a CD player D/A converter is done in two stages. A four times oversampling filter is followed by a 64 times linear interpolator. The direct use of a 256 times oversampling filter is also possible, but the filter would be very large. A linearly interpolating filter is easier to build, and at 4fs the distortion that it creates has only little effect in the audio band. Then, at 256fs, a second order noise shaper suffices to get a 1 bit signal with 16 bit resolution in the audio band. Unfortunately 256fs = 11MHz which is too high for power switching.
Another possibility is to use only 32fs with an eighth order noise shaper.
Noise shapers with a higher order than three are prone to instability, and it is necessary to manipulate the system when it becomes potentially unstable. Extensive simulations are necessary for evaluation. Even in this case, the switching frequency is 1.4 MHz. The high switching frequencies are a general problem of PDM modulators. Bit-flipping techniques can reduce the average frequency at which the output changes somewhat.
Digital PWM modulators
Digital PWM modulators offer a lower switching frequency than PDM modulators. The Pulse Amplitude Modulated (PAM) samples are converted to PWM. This could be done by giving each pulse a length that is proportional to the original amplitude. However, for CD quality the internal clock frequency would have
to be 2^16 * 44.1 kHz = 2.9 GHz, which is way too high. Furthermore, the frequency spectrum of the PWM signal would not equal that of the PAM signal. This can be calculated, but for a better understanding it is best to realise that natural sampling yields the best results because it does not introduce harmonic distortion. In natural sampling, the audio signal is compared to a triangle or sawtooth waveform (more details below). When we convert a digital PAM signal directly to PWM, it looks as if, looking in the analogue domain, we compared the sawtooth waveform to a step-like representation of the signal instead of the signal itself. This is called uniform sampling. See Picture 6. It introduces harmonic distortion, which depends on many factors including the signal frequency, the switching frequency and the modulation depth.
Picture 6: Natural sampling versus uniform sampling
To approximate natural sampling, linear or higher order interpolation between two or more samples is used to approach the natural PWM pulse width. When the pulse width has been calculated, the sample instant can be the beginning or the end of the pulse (single sided modulation) or the middle (double sided modulation). There are more aspects that deserve attention, but a full discussion of these would be beyond the scope of this article.
Analogue PWM modulators
In the analogue domain a PWM signal can be generated by comparing the audio signal to a triangle or sawtooth waveform. This technique, called natural sampling, is the basis of almost all analogue modulators. See Picture 7. When the momentary value of the input signal is larger than the triangle, the output of the switch is high. It is easy to see that in this way the pulse width at the output is proportional to the input voltage. The modulator does not introduce harmonic distortion, only (multiples of) the carrier frequency and (multiples of) harmonics of the modulating frequency around the carrier.
Picture 7: Open-loop class D modulator
The main problem is the lack of feedback. Output stage inaccuracies, nonlinearities, timing errors and supply voltage variations all contribute to the distortion. We will discuss feedback here, as it is so closely related to the modulator. Picture 8 shows a modulator with feedback. Both inputs to the comparator have triangular waveforms. Picture 9 shows the waveforms for zero and positive output voltage. At zero output voltage, the feedback signal intercepts the reference triangle in such a way that the duty cycle is 50 %. When the output voltage is not zero, the rising and falling slope of the feedback triangle are different, leading to a larger (or smaller) duty cycle.
Picture 8: Modulator with feedback
Picture 9: Signals at the input of the comparator of the feedback modulator
The slew rate of the feedback signal must always be smaller than the slew rate of the reference triangle. Otherwise, the amplifier starts oscillating at a very high frequency. This constitutes a compromise between switching frequency and loop gain. The slew rate requirement can roughly be translated to the demand that the loop gain of the amplifier at the switching frequency is smaller than 0.5. Thanks to the integrator, the open loop frequency transfer of the amplifier is first order, so that the loop gain at a certain frequency has a maximum that is related to the switching frequency. A way to get more loop gain at low (audio) frequencies is by introducing a range with second order frequency response in the loop. As long as the loop gain is back to first order at 0 dB, stability is ensured. This can be done in the modulator by adding a second integrator before the comparator while bypassing it for high frequencies. In practical realisations of a feedback modulator, the triangle is generated by adding a square wave to the input of the integrator. The feedback properties of this type of modulator can also be used when the input signal is generated by a digital modulator. Because in that case the bitstream is already clocked, the negative input of the comparator can be tied to ground. Other techniques, like the one cycle control technique or pulse edge delay error correction, are similar to this modulator in their attempt to control the integral of the switched output voltage.
The high frequency oscillation that occurs in a feedback modulator when the feedback signal is too large, is exploited in the self-oscillating class D modulator. See Picture 10. The comparator is equipped with some hysteresis to control the switching frequency. Other factors that influence the switching frequency are the integrator time constant and the output voltage. For large output voltages, the frequency approaches zero. This can cause aliasing problems that can be overcome by using a comparator with a variable hysteresis dependent on the input voltage. In that way the oscillator frequency is kept constant over a wide range of output voltages.
Picture 10: Self oscillating class D modulator
In the situations above, feedback is successfully taken before the output filter. The combination with feedback after the filter is more troublesome.
Output Filter in Class D Amplifier
The output filter is a low pass filter that reduces the switching frequency. When designing the filter, the load impedance is part of the equation. Thus, the load can seriously affect the frequency transfer. For different loudspeakers, the impedance over the audio range can vary from 1 Ω to as much as 30 Ω, with a phase from +56º to - 67º. Picture 1 shows the impedance of a 3-way loudspeaker system that was used in the listening tests.
Picture 1: Loudspeaker impedance
The output filter, however, is designed for a real and constant load impedance. The result of connecting the loudspeaker is shown in Picture 2. The flat line is the simulated transfer of an ideal class D filter followed by a fourth order Butterworth filter with a corner frequency of 30 kHz, loaded with the specified load impedance of 4 Ω. The other line shows what happens when the loudspeaker is connected. The transfer deviates several dB’s from the flat line. This will colour the sound impression. Another problem is that any non-linearities in the filter show up in the distortion figures.
Picture 2: Simulated class D frequency transfer with resistor and loudspeaker load
Feedback can reduce these problems considerably, but because of the phase shift, feedback after (part of) the filter is complicated. In general, the filter (or the filter in combination with lead compensation) must have a first order frequency transfer at 0 dB to ensure stable operation. This is extra complicated by the connected load, which is a part of the filter. High feedback factors can not be realised and feedback around a filter with more than 2-nd order behaviour is very rare. Even when these problems are overcome, the filter prevents further integration because it contains elements that can not be integrated on chip. For sufficient suppression of the carrier frequency, typically a fourth order filter is necessary. In this case, the amount of filtering in practical situations is limited by parasitic capacitances and resistances. Furthermore, two coils and two capacitors are already considered to be many external components. Using only a second order filter is a solution, but the amount of switching ripple can cause EMI problems and the application area of the amplifier will be limited.
Switching Amplifiers - Class D
Linear amplifiers are amplifiers with a linear output stage, in which there exists a voltage drop across the output transistors to generate the correct output voltage. Even though most of these amplifiers use some sort of switching, they are not to be confused with switching amplifiers. Switching amplifiers are amplifiers with a switching output stage. This means that the transistors in the output stage have a switch function. Any simultaneous occurrence of voltage across and current through these transistors is undesirable.
The class D principle
A typical class D amplifier consists of a modulator that converts an analogue or digital audio signal into a high frequency Pulse Width Modulated (PWM) or Pulse Density Modulated (PDM) signal followed by the output stage, often a half bridge power switch (Picture 1). The output of the switches is either high or low, and changes at a frequency that is much higher than the highest audio frequency. Typical values are between 200 kHz and 500 kHz. The frequency spectrum of the PWM signal in the audio band is the same as the frequency spectrum of the audio signal. An LC filter filters out the high frequency switching components, so that the audio signal is available at the output of the filter. Ideally, the switches do not dissipate and neither does the filter, so the efficiency can be very high.
Picture 1: Principle of PWM amplifier
For a 10 kHz sinewave, a switching frequency of 350 kHz, and a filter with a 30 kHz Butterworth characteristic, the signals look like Picture 2. In this case, the audio frequency is close to the corner frequency of the filter, so some phase shift can be observed between the PWM signal and the audio signal.
Picture 2: Class D output signal (before and after the filter)
Output stage
Picture 3 shows a typical class D output stage. It is a class AD stage, which is used for most class D amplifiers. It is a simple inverter. When the input signal is positive, M2 conducts. When it is negative, M1 conducts.
Picture 3: A typical class D output stage
The diodes D1 and D2 are needed because the transistors are unidirectional switches. Suppose the output signal is positive, and the output current Io is also positive. When M1 is switched on, this is OK, but when M2 is switched on, the coil in the output filter still tries to keep the current Io, forcing the output voltage below -VS, causing D2 to conduct. With DMOS transistors as switches, the intrinsic diodes can be used. However, the intrinsic diode of a DMOS transistor can have a long recovery time (several hundred ns) or cause latch-up. In that case external (shottky) diodes are a solution, although not a desirable one. It is also possible to build DMOS transistors with a fast-recovery intrinsic diode.
Switching speed
High switching speeds are necessary to keep switching losses small. Typical values of today’s integrated designs are tens of nanoseconds. Because of the large gate-source capacitances of M1 and M2, this leads to large peak currents. Also, the high speed switching in combination with wires and (gate) capacitances can cause ringing, overshoot, and delays. For a low distortion it is important that the switching times of M1 and M2 are equal. Tuneable coils between M1 and M2 can provide a solution. However, both the fact that these coils can not be integrated and that they need to be tuned make this an unattractive solution. With high speed switching, the risk of common conduction of M1 and M2 increases. The introduction of a "dead zone" in which both transistors are turned off is a common solution, although this introduces extra distortion in the audio signal. Another option is a handshake procedure to check if the other transistor is turned off.
Power supply
In pure feed-forward systems a stable power supply is extremely important, because any deviation from the nominal value shows up in the output signal. For an output signal of 16 bit accuracy, the power supply should have a 16 bit stability. Common solutions are feedback from the pulsed output or feed-forward correction by referring the triangle waveform to the supply voltage. Another supply issue arises from the use of NMOS devices that are preferable thanks to the lower R on per area. The gate of M1 needs a voltage that is higher than VS. A bootstrap capacitor or a charge-pump can provide such a voltage.
Cross-over distortion
M1 and M2 have a certain Ron resistance. D1 and D2 have a certain voltage drop when conducting. Suppose the output current is positive. During conduction of M1, the voltage will be a little lower than VDD because of Ron1. During conduction of D2, the voltage will be a little lower than -VS due to the voltage drop. So all the time the voltage is lower than it should be. When the output current is negative, the same reasoning shows that the output voltage is too high. This results in crossover distortion. It can be solved by connecting the transistors to a tap of the output inductor or a separate supply voltage.
Class BD output stage
An alternative to the class AD stage is the class BD stage. In class BD there are three possible output voltages: positive, negative, and zero. There are several ways in which this can be implemented, but the simplest one is shown in Picture 4.
Picture 4: Class BD modulator with output filter
In quiescent, the signal at A and B is the same PWM signal with 50 % duty cycle. The signal A-B across the filter is therefore zero. For a positive output voltage, the duty cycle of A is increased and that of B decreased. The difference signal A-B is now a voltage that varies between 0 and VS. Similarly, for negative output voltages, A-B varies between 0 and -VS. The pulse frequency of A-B is doubled compared to A and B, which is favourable for speed requirements. Balanced current design has the same qualities and the topologies are very similar. The difference between a bridge class BD stage and a bridge class AD stage is subtle. The topologies are exactly the same. In the class AD case, however, A is always the inverse of B, so that A-B alternates between -VS and VS.
Resonant output stage
A way to generate the high frequency pulses for a PDM modulator is to use a quasi-resonant converter. This converter gives 1 bit each time it is switched on. The bit is not a squarewave, but the positive half of a sinewave. This is irrelevant, as long as the area under the signal is the same each time. For the topology in Picture 5 (Lf and Cf are the output filter) this is true, virtually independent of output current and voltage. Switching occurs when the current is zero, giving better efficiency and lower switching noise. The large number of filter components make this topology not very attractive for use with integrated circuits.
Picture 5: Quasi-resonating converter
Summary and Conclusions
The design of a class D output stage is not a trivial matter. In general, an output stage will not be able to preserve the exact frequency content of its input signal. To summarise the limitations that were encountered, it is easy to start with an important audio amplifier specification: low distortion. With feedback directly from the switched output, very good high power PWM signals can be generated. The output filter, however, introduces additional distortion and deviations of the specified frequency transfer when non-resistive loads are connected. Feedback after the filter is difficult, and high feedback factors can not be realised. Even when these problems are overcome, the filter prevents further integration because for sufficient suppression of the carrier frequency, typically a fourth order filter is necessary. It is not possible to eliminate the external two coils and two capacitors without introducing a much larger switching residue.
Linear amplifiers have a low complexity, can have a low distortion, but show limited possibilities for reduction of the dissipation. To reduce the dissipation to very low values, complex switching schemes are necessary, and a large number of external elcos makes such a solution little attractive. Switching amplifiers can have a very low dissipation, but suffer from switching noise at the output, an external filter, a load dependent frequency transfer and difficulties in achieving a low distortion. The idea that a mix of these two systems may be beneficial is not new, and there are a lot of possibilities for such combinations.
Class H Amplifier
It is not necessary to use two power supplies like in class G amplifier. Because the signal peaks generally last only a short time, the energy can be supplied by a capacitor. This technique is referred to as Class H (Picture 1).
Picture 1: Class H amplifier
During low output voltages, the switch is in the position as drawn in Picture 1. During signal peaks the switch lifts the lower side of the elco to the power supply, such that the upper output transistor sees a voltage of approximately 2Vdd. The time that the signal is "high" should not be too long. A large elco is required for high power at low frequencies. Switching according to the envelope of the signal, as is sometimes done with class G amplifiers, is riskier as it is impossible to tell how long an envelope will last.
The advantage of class H is that only one power supply is needed. As such it is ideal for car audio applications. To prevent the need for four lifting elcos, it is then built like a bridge amplifier with a signal dependent common mode level. Picture 2 shows a class H bridge amplifier. The common mode level is normally half the supply voltage. When the load voltage must be higher than Vdd, the common mode level of the bridge is increased such that one half of the bridge remains at a constant voltage close to ground and the other half gets the lifted supply voltage. See Picture 3 for the waveforms of the two bridge halves for a sinusoidal output.
Picture 2: Class H Bridge amplifier
Picture 3: Wave forms of both bridge halves for a sinusoidal output
For normal audio signals, and even for a rail-to-rail sinewave, only one lifting circuit would suffice. In practice this is not implemented, because it’s a bad habit to test audio amplifiers with near rail-to-rail squarewaves, which give the lift elco not enough time to recharge.
Class G Amplifier
A class B amplifier has relatively high efficiency for a rail-to-rail sinusoid. This figure is relatively good because the output signal is close to the supply lines a considerable part of the time, with a limited voltage drop across the output transistors. The output signal for audio, however, is close to zero most of the time, with only few excursions to higher levels. Thus the average voltage drop across the output transistors is large, causing the poor efficiency figures for audio.
An amplifier in class G uses multiple supply voltages. At lower power levels, the lower supply voltage is used. When the signal becomes too large for this supply, the higher power supply takes over, and delivers the output power. In this way the average voltage drop across the output transistors is reduced and the overall efficiency can be improved. There are two basic ways in which class G amplifiers are realised. The difference is the way of switching between the supply voltages. Picture 1 shows the upper half of a possible output stage. The upper transistor is switched on during signal peaks increasing the power supply of the lower transistor that controls the output voltage from Vdd1 to Vdd2. Another way to use this circuit is opening the lower transistor totally during signal peaks, giving the higher MOST the role of output transistor.
Picture 1: Serial Class G amplifier
A disadvantage of this circuit is that there are always two elements in series. At low output voltages, the diode decreases the efficiency. During signal peaks the two transistors are in series, so that the output current has to pass two VDS voltage drops. Picture 2 shows a parallel topology that does not suffer from these problems. It needs special precautions in the driver circuitry, however, to prevent high VGS reverse voltages across the upper left output transistor.
Picture 2: Parallel Class G amplifier
In general, the need for multiple supplies may be a problem. If a transformer is used in the power supply, multiple taps are a good solution, but if a car battery is used, it is more problematic. Another problem with this type of amplifiers is the distortion caused by the switching between the two amplifiers. By using a comparator with hysteresis and delay to decide between the supplies, the number of changes can be reduced, but this is a very inelegant way to reduce the total distortion. Another way to limit switching distortion is by switching between the two amplifiers gradually. However, this cuts down the efficiency a little.
Linear Amplifiers Class A, B and AB
Linear amplifiers, are amplifiers with a linear output stage, in which there exists a voltage drop across the output transistors to generate the correct output voltage. Even though most of these amplifiers use some sort of switching, they are not to be confused with switching amplifiers. The output stage of a power amplifier has perhaps the greatest influence on performance and cost. The output stage must also operate at high power levels, often at elevated temperatures, where difficult loads, high voltages, and high currents may exist. Indeed, there is often a trade-off between heat generation and sound quality.
Every real amplifier has some unavoidable limitations on its performance. Some of the main limitations which should be considered are:
>> Limited bandwidth. In particular, for each amplifier there will be an upper frequency beyond which it finds it difficult or impossible to amplify signals.
>> Noise. All electronic devices tend to add some random noise to the signals passing through them, degrading the SNR (signal-to-noise ratio).
>> Limited output voltage, current and power levels. This means that a given amplifier can't provide output signals above a particular level. In other words, there is always a finite limit to the output signal size.
>> Distortion. The actual signal pattern will be altered due to non-linearities in the amplifier.
>> Finite gain. A given amplifier can have a high gain, but this gain can't be infinite, so may not be large enough for a given purpose. That's why multiple amplifiers or stages are often used to achieve a desired overal gain.
The various limitations demands the various changes in the design of the amplifiers. That lead us to the concept of amplifier classes.
Class A, B and AB
The output transistors in a push-pull class A power amplifier remain in conduction throughout the entire cycle of the audio signal, always contributing transconductance to the output stage signal path. In contrast, the output transistors in a class B design remain on for only one-half of the signal cycle. When the output stage is sourcing current to the load, the top transistor is on. When the output stage is sinking current from the load, the bottom transistor is on. There is thus an abrupt transition from the top transistor to the bottom transistor as the output current goes through zero.
The formal definition of classes A and B is in terms of the so-called conduction angle. The conduction angle for class A is 360 degrees (meaning all of the cycle), while that for class B is 180 degrees. More accurately, the definition should really be the angle over which the transistor contributes transconductance to the output stage and signal current to the output. This precludes many so-called nonswitching amplifiers from being called class A. Such amplifiers include bias arrangements that prevent the power transistor from completely turning off when it otherwise would. Most power amplifiers are designed to have some overlap of conduction between the top and bottom output transistors. This smoothes out the crossover region as the output current goes through zero. For small output signal currents, the output transistors are in the overlap zone and the output stage effectively operates in class A. These amplifiers are called class AB amplifiers because they possess some of the characteristics and advantages of both class A amplifiers and class B amplifiers. Most push-pull vacuum tube amplifiers operate in class AB mode. Class AB output stages have a conduction angle that is greater than 180 degrees, although sometimes only slightly so.
Class A
A simple example of a Class A amplifier stage is a common emitter amplifier circuit. Class A amplifiers have the general property that the output device(s) always carry a significant current level, or they have a large quiescent current. The quiescent current is defined as the current level in the amplifier when it is producing an output of zero. The main disadvantage of Class A amplifiers is that current is flowing through the output transistor and its resistor even when there is no signal. Power is being used but no sound or other form of output activity occurs. Such amplifiers are inefficient because they waste 50% of the energy supplied to them. If an amplifier is to produce enough output power to drive a motor or high-wattage speaker, we must design the output stage of the circuit to avoid such waste. The most inefficient amplifier is single ended. More efficient amplifier can be made by employing a double ended or push-pull arrangement. On Picture 1 is shown an example of output stage in push-pull arrangement which works in Class A. This arrangement employs a pair of transistors, one is an NPN, the other is a PNP bipolar transistor.
Picture 1: Push-Pull output stage in Class A
The transistors in this circuit can be controlled using a pair of input voltages, V1 and V2. Therefore, the currents I1 and I2 can be altered independently, by wish. In practice, the easiest way to use the circuit is to set the quiescent current to half the maximum level we except to require for the load. Then adjust the two transistor currents "in oposition". It is the imbalance between the two transistor currents that will pass through the load, so this means the transistors "share" the burden of driving the output load.
Class B
Simply by changing the quiescent current or bias level in class A amplifier and then operating the system slightly differently, we can make another forms of amplifier. The simplest alternative is the Class B arrangement. To illustrate how this work, consider the circuit shown on Picture 2. This arrangement again employs a pair of transistors. However, their bases (or inputs) are now linked by a pair of diodes. The current in the diodes is mainly set by a couple of constant current stages which run a bias current, ibias, through them. If the forward voltage drop across each diode is Vd, then the voltage of the input to the base of the upper transistor is Vin + Vd, while the voltage of the input to the base of the lower transistor is Vin - Vd. Taking into account that the base-emitter junction of a bipolar transistor is essentially a diode, then the voltage drop between the base and the emitter of the transistors will also be Vd, by absolute value. That leads to the very interesting result where the emitter voltages in the circuit shown on Picture 2 will be V1 = V2 = Vin.
Picture 2: Class B output stage amplifier
This result has two implications. First, when Vin = 0, the output voltages will be zero. Since the voltages above and below the emitter resistors RE will both be zero, it follows that there will be no current at all in the output transistors. The quiescent current level is zero and the power dissipated when there is no output is also zero. So, this circuit has perfect efficiency. The second implication is that as Vin is adjusted to produce the signal, the emitter voltages will both tend to follow it. When the load is connected to the output circuit, it will draw current from one or the other transistor, but not from both. When a positive voltage is produced, the upper transistor conducts and draws the current through the load and the lower transistor is Off. On the ther hand, when a negative voltage is produced, the lower transistor conducts and draws the current through the load and the upper transistor is Off. This again means that the system is highly efficient in power terms.
When power efficiency is the main requirement, then Class B is very useful. However, for this circuit to work as explained, it requires the voltage drops across the diodes and the base-emitter junctions of the transistors to be exactly the same. In practice, this is impossible for many reasons. Firstly, no two physical devices are absolutely identical. The diodes and the transistors will have differently doped and manufactured junctions, designed for different purposes. The currents through the transistors is far higher then through the diodes. The transistors will be hotter than the diodes due to the higher power dissipation. When the applied voltage is changed, it takes a time for a PN junction to react and for the current to change. Also, the transistor can't be turned off right away and stop conducting. As a result, the transistors tend to lag behind any swift changes.
The overall result of the above effect is that the Class B arrangement tends to have difficulty whenever the signal waveform changes its polarity and the transistors turns on and off. The result is what is called crossover distortion and this have a very bad effect on small level or high speed waveforms. This problem is enhanced due to non-linearities in the transistors, meaning that the output current and voltage don't vary linearly with the input level. The effect of the crossover distortion is shown on Picture 3. It is proportionately greater in small signals.
Picture 3: Crossover distortion (as the signal swings between positive and negative)
So, the Class A is very power inefficient, while the Class B is far more efficient, but it can lead to signal distortions. The solution is to find a half-way which will take advantages of both arrangements and will minimize the problems. The most common solution is Class AB amplification.
Class AB
The Class AB arrangement can be seen to be very similar to the Class B circuit. In the example shown on Picture 4, it just has an extra pair of diodes. The change that these makes is, when there is no output, there is a potential difference of about 2 x Vd between the emitters of the transistors. As a consequence, there will be a quiescent current of about Iq = Vd/RE, flowing through both transistors when the output is zero. For small output signals (which requires output currents in the range -2Iq < IL < 2Iq), both transistors will conduct and act as a double ended Class A arrangement. For larger signals, one transistor will be off and the other will supply the current required by the load. Hence for large signals the circuit behaves like a Class B amplifier, this mixed mixed behaviour caused this arrangement to be called Class AB.
Picture 4: Class AB output stage amplifier
Summary
Class A amplifiers employ a high quiescent or bias current, which causes large transistor currents even when the output signal level is small. Therefore, the power efficiency of class A amplifiers is poor, but they can offer good signal performance due to avoiding problems with effects due to low current level nonlinearities causing distortion. Double ended output design is more efficient than a single ended. Class B has a very low or perhaps zero quiescent (bias) current, and hence low power dissipation and optimum power efficiency. Class B may suffer from problems when handling low level signals. That's why the class AB is often the preferred solution in practice.
Subscribe to:
Comments (Atom)