Project design of Auxiliary Energy


As already described, the project design work also includes the appropriate project documentation for the provision of the electrical, pneumatic and hydraulic auxiliary energy, apart from the core project. Due to the technical specifics and considerable amount of work involved, the electrical project accounts for the greater part except for the core project. The principal outlines of the electrical project design are therefore introduced in shortened form.


Determining the required electrical power (connected load)


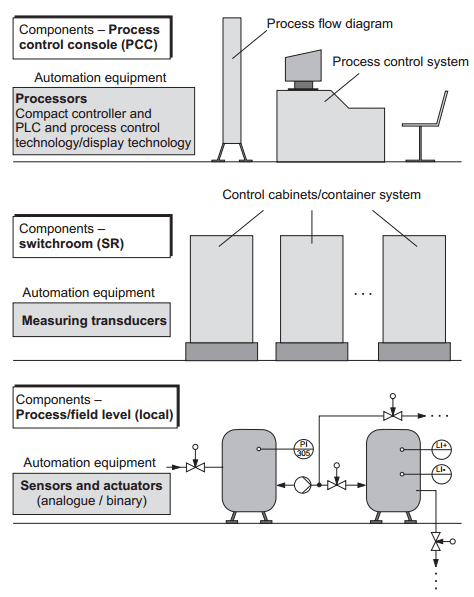
The first point to be established is what electrical connected load is to be made available for the operation of the automation system. This is assessed on the basis of the preliminary EMCS block diagram and the automation equipment set out in the equipment list and the required electrical voltages (e.g. 230 V AC, 24 V DC) and capacities established. All EMCS points are subject to these analyses and the entire electrical power required determined by way of coordinating these.


Regarding the connection/combination of electrical project and core project


The EMCS block diagram based on the preliminary EMCS block diagram also defines the detailed cabling for the required voltage supplies. This highlights the relevance of the question for an interface for the respective reduction of the required voltages. Picture 1 illustrates a structure, which provides a solution to this problem.


Picture 1: Combination of core project with electrical and pneumatic project


This means that the selection of a voltage-proof terminal distributor provides a means of connecting the voltages resulting from the electrical project established on the input side and conducting these to the EMCS points on the output side of the terminal distributor. This allocation (block diagram) is uniquely documented in the so-called connection list. As Picture 1 also shows, this principle is also used to realise the supply of pneumatic and hydraulic auxiliary energy (connection list). Moreover, reference is also made to the additional problems to be solved of EMC and lightning and explosion protection.


Distribution of auxiliary electrical power


Based on the established connected load, a favourable structure is to be developed for the distribution of this electrical power. In accordance with the PI flow diagram familiar from the core project design, a general structure is also required for the distribution of the electrical auxiliary power with regard to the electrical project. Picture 2 shows a generally applicable and typical structure for this. When the electrical project is further configured, this needs to be expanded by a second version comprising documentation of basic wiring and switching devices.


Picture 2: Basic structure for distribution of electrical auxiliary energy


Depending on the extent of the electrical project, this general overview is followed by a further breakdown into one or several levels, by developing the so-called circuit diagrams, which are also based on the EMCS block diagrams realised during the core project design. These circuit diagrams define the detailed distribution (wiring) of the electrical auxiliary power. The example of a typical component is used – connection of the auxiliary electrical power – to define the circuit diagram (Picture 3) for the latching connection of processors and three-phase current consuming devices. This circuit diagram illustrates for instance that the processors and current consuming devices must always be connected separately or that for reasons of safety, two contactors (C1/C2; C3/C4) must always be released when these are switched off or in the case of an emergency-stop.


Picture 3: Circuit diagrams for electrical auxiliary energy (self-latching) for processors/PLC technology and three-phase consuming devices


Understandably, the above information merely provides an idea of the extent and technical contents of electrical project design. In the sense of a holistic preparation of the project of an automation system, it is essential to remember that, apart from the core project design, the electrical project design is the fundamental basis. This fact should be taken into account with regard to the time schedule and cost plan to ensure the success of the project design work.


Notes regarding assembly project design


Apart from the core and electrical project design, the assembly project design represents the most important aspect for the realisation of an automation system. It takes into account all the construction and assembly technological aspects. Based on the design of the process technology system, including any associated building components, the assembly project design deals with problems such as:

>> configuration of the cable run guides (for EMCS and electrotechnology);
>> determining of material requirements for cable runs (number of cable run components, supports, brackets, etc.);
>> determining of cable lengths and types of cable, design and construction of cable harnesses;
>> spatial planning of the required container units and auxiliary units (e. g. compressor room, emergency power source) etc.

These services must also be implemented with the greatest of care, since they are crucial in determining the cost efficiency and schedule effectiveness of the practical realisation (assembly) of an automation system.

Final EMCS block diagram


Based on the preliminary EMCS block diagram, the final EMCS block diagram documents the detailed wiring of the automation equipment and thus represents the basis for the creation of the wiring documentation. To provide a better understanding, reference is again made to the structure of an automation system, which now poses the task of interconnecting the components process control console, switchroom and field by means of wiring. The basis of this wiring are the respective wiring harnesses and the corresponding terminal distributors. Picture 1 illustrates the structure of the wiring paths and the assembly points of these terminal distributors defined in the container units of process control console, switchroom and as such in the terminal boxes at field level. This illustrates that the terminal distributors are the major support points for the wiring paths, since they accommodate the incoming cables and route them via corresponding wiring blocks to the assembly levels of the control cabinets or other container units.


Picture 1: Structure of wiring path


Picture 2 provides an initial introduction to the principle designation of a terminal distributor.


Picture 2: Basic designation of a terminal distributor


It should be noted generally that the terminal distributor designation always starts with the letter X, and completed by an ordinal number and
a consecutive number. Here, the hardware design of the terminal distributors is also of interest.

Picture 3 provides a closer introduction of this design. In the sense of a general evaluation, it is always important to ask where a line (cable) is coming from (from which terminal distributor) and where it is to lead to (to which terminal distributor / assembly area).


Picture 3: Design of a terminal distributor


For instance, the main wiring paths are also clearly defined in Picture 1, and can be used as a general orientation for any automation system. On the assumption that the respective sensors and actuators are connected to the terminal boxes at field level, the following wiring paths can be defined in sequence:

Path 1: From terminal box-field level to terminal distributor-switchroom, e.g.: X300.01 ⇒ X200.01;
Path 2: From terminal strip-switchroom to assembly area switchroom racks, e.g.: X200.01 ⇒ Level A/Area 1;
Path 3: From assembly area switchroom racks via terminal distributor switchroom to terminal distributor process control console, e.g.: Level A/Area 1 ⇒ X200.02 ⇒ X100.01;
Path 4: From terminal distributor-process control console to PLC, e.g.: X100.01 ⇒ P-I/O card of PLC (DE 1);
Path 5: From PLC to terminal distributor-process control console, e.g.: P-I/O card of PLC (DA 11) ⇒ X100.01;
Path 6: Terminal distributor-process control console to terminal distributorswitchroom, e.g.: X100.01 ⇒ X200.01;
Path 7: Terminal distributor-switchroom to assembly area-switchroom racks, e.g.: X200.01 ⇒ Level A/Area 2;
Path 8: Assembly area-switchroom racks via terminal distributor switchroom to terminal box field level, e.g.: Level A/Area 2 ⇒ X200.02 ⇒ X300.01;

The wiring lists are then set out in accordance with these wiring paths and, as such, the connections documented in the final EMCS block diagram of the automation equipment involved in the configuration of the EMCS points, are put into an easily manageable form for the process control engineer.


Picture 4: Final EMCS block diagram – Filling level closed control loop (LIC 30) (Section 1 and 2)


Picture 4 also uses the example of the filling level control (LIC30 small-scale experimental modules) to introduce the final EMCS block diagram and to give a partial representation of a wiring list. The wiring list is partially represented in the table shown on Picture 5, and set out in accordance with the configuration already described.


Picture 5: Wiring list (excerpt A) using the example of the filling level closed control loop (LIC30/Section 2)

Symbols in PI Flow Diagram


As already mentioned, appropriate symbols are used for the creation of preliminary and final EMCS block diagrams (DIN 19227/Part 2), whereby the automation equipment actually used in the configuration of an EMCS point are defined. If we refer to the sample structure indicated in Picture 1, this begins with a practical method of approach with the symbols for field instrumentation, and then deals with the processors or other components (e. g. displays).


Picture 1: Preliminary EMCS block diagram – filling level closed control loop


In conformance with DIN 19227/Part 2, the term ’detector’ is now also given for sensors (measuring technology) and the following symbols are recommended:


The following symbols are to be used for the actuators deployed at field level (process):


DIN 19227 also provides a series of symbols for the measuring transducers / signal converters (adapters / safeguarding of standardised signal concept) installed in the switchroom.


Finally, appropriate symbols also need to be used for the automation equipment of the process control console (process control system / compact controller / display).


Additional symbols are used as a result of the displays (outputs), which are also located in the process control console.


The following symbols are used to represent the binary control systems, which are also required to automate process technology operations.


This set of symbols covers all the important automation equipment to be recorded in the EMCS block diagrams.

Finally, appropriate symbols also have to be used for the connection of of this automation equipment to identify the corresponding transmission lines in accordance with DIN 19227/ DIN 19227/Part 2.


One concluding consideration of significance for the immediate preparation of these EMCS block diagrams, arises from the question concerning the type of hardware used for automation equipment. The following should be noted in this context:

>> The proposed symbols for sensors and actuators are to be used independently of the basic hardware used (e. g. size, constructional design, etc.).
>> The symbols you are now familiar with are modified as follows for the equally essential processor and display technology, as well as the measuring transducers and binary control system, which can also be realised, e.g. in a process control system, by means of software functions:


As already indicated, the preliminary EMCS block diagram connects the automation equipment required for the configuration of EMCS points. The small-scale installation is used as an example to set out the preliminary EMCS block diagram for the filling level closed control loop (Picture 1).
To this end, the following have been configured, based on the structure of an automation system: Sensors and actuators at the field level; measuring transducers in the switchroom, plus for instance also a compact controller (PLC technology), and the operating and monitoring computer in the process control console. In parallel with the preliminary EMCS block diagram, the so-called Equipment list (Table shown on Picture 2) is prepared.


Picture 2: Equipment list for filling level closed control loop (LIC 30)


This list is drawn up for each EMCS point and in that order contains the automation equipment for sensor, actuator, transducer and processor technologies with precise designation so that, apart from the purpose of documentation, it also contains the necessary ordering information. In addition, the so-called allocation lists are also prepared on the basis of the preliminary EMCS block diagrams. The allocation lists are geared to the container systems used in the automation system and as such provide the assembly specification for the attachment of the automation equipment deployed (Picture 3). In this context it should be noted that the container systems used are subdivided into assembly levels and these again into assembly positions. The allocation list is therefore a clearly arranged document used directly for the assembly of the automation equipment.


Picture 3: Allocation list – Basic configuration

Concept of standardised signals


Working on the premises of the basic structure of the automation system and taking into consideration the individual automation devices allocated, the question of simple and clear interconnectability of these different types of automation equipment is of some importance, particularly when considering the wide range of products on offer from the various automation equipment manufacturers. The introduction of the so-called standardised signals solves this problem. Today, these standardised signals are used worldwide by manufacturers of automation equipment.

For electrical auxiliary energy:

>> 4...20 mA (preferably)
>> 0...20 mA
>> 0...5 mA
>> 0...10 V
>> -10 V...+10 V

For pneumatic auxiliary energy:

>> 20 kPa...100 kPa or
>> 0.2 bar ...1 bar


This standard conforming representation of the integration of standardised signals into the structure of the automation system is used as a basis for the creation of the following project documentation. At the same time, it can be seen that advanced automation tools are generally moving towards the use of standardised signals, i.e. sensors immediately provide standardised signals or the actuators are directly pressurised (e.g. pneumatic actuating devices) by means of standardised signals. As such, the integration of the standardised signals shown in Picture 1 is modified so that, as shown in Picture 2, a direct connection is realised between process and process control system (elimination of measuring transducer and signal converter). The switchroom is therefore only used to provide the electrical auxiliary energy (power supply) and for the so-called routing of field signals. This routing of field signals takes place in such a way that their distribution to the basic units of the process control system used offers the best possible process reliability (redundancy thanks to favourable distribution of monitoring signals).


Picture 1: Introduction of standardised signals into automation system structure


Picture 2: Modified linking of standardised signal path in the automation system structure

PI Flow diagram


As detailed, the necessary EMCS points are entered in the process flow diagram, and the number and function of the individual EMCS points precisely defined. To obtain a PI flow diagram in conformance with the standard (DIN 19227/Part 1), the type, inclusion into the basic structure of the automation system and the functionality (letter code) are to be defined in accordance with steps 1 to 3:

Step 1 – Type of EMCS point


>> Depending on the functional scope of the EMCS point (designation scope of letter code) the following symbols are used:


>> If a process control system is used:


>> If a programmable logic controller is used (PLC technology):


Step 2 – Integration of EMCS point into the basic structure of the automation system


>> If we go back to the basic structure of the automation system, the EMCS point initially determined according to type is to be further modified into:


>> The project designer also defines what the EMCS point will be or which components of the basic structure of the automation system it will cover.


Step 3 – Functional content of EMCS point


>> The functional content of the respective EMCS point is uniquely defined by the letter code; the letter code selected for each EMCS point specifies whether it is to be entered in the process flow diagram as a separate measuring point, closed control loop or binary measuring system.


In accordance with DIN 19227 (Part 1/Sheet 6), the use of the letter code and the design of the PI flow diagram (interpretation of the EMCS point) are explained with the help of the introductory example (Picture 1).


Picture 1: Introductory example demonstrating the letter code in the PI flow diagram (using the example of a temperature measuring point)


Generally, letters are to be used in the following order:

>> Initial letter for typical process technology process parameters:

T – Temperature;
P – Pressure;
F – Flow rate / throughput;
L – Filling level /height and;;
Q – Quality (e. g. pH-value);

>> Second letters for the modification of these process parameters:

D – Difference;
F – Relationship;
J – Measuring point sensing;

>> Subsequent letters (1st subsequent letter/2nd subsequent letter) – for the typical functions for the automation of process technology operations:

C – Closed loop control;
I – Display;
R – Registration;
S – Circuit, sequence control/logic control system;
Y – Arithmetic function;

The EMCS point number which is also defined in the introductory example is introduced dependent on the project and can, for instance, comprise three, four or more characters.


Picture 2: Method of operation of servo controlled equipment (in PI flow diagram)


The practical implementation of the PI flow diagram


The PI flow diagram therefore forms the definitive basis for further realisation of the automation system project with regard to technical engineering. This requires a corresponding project classification, e. g. for the selection of sensors, actuators and processors. Within this context, the selection of sensors and actuators is also designated in the form of field instrumentation and the additionally required second task of configuration in the form of – selection of the process control technology. This enables the task to be subdivided and very often translated into practical team work. This means that, one section of the team prepares the field level instrumentation, and the other section the selection and commissioning of the process control system.
To provide a better understanding, the small-scale trial system is used as an example to introduce the official PI flow diagram in accordance with DIN, followed by the PI flow diagram variant favoured by the Department of Automation. The latter is also within the framework of DIN 19227, but specifies the allocated sensors as additional EMCS point for each closed loop control and binary control system. This creates a central interface, the EMCS points terminal, which provides the field signals for the connection of the process control technology (Picture 3).


Picture 3: PI Flow Diagram


Within the framework of the core project design, the PI flow diagrams are followed by the so-called EMCS block diagrams. In the sense of a level-graded project specification, a preliminary EMCS block diagram and a final EMCS diagram are prepared for each EMCS point, whereby the preliminary EMCS block diagram defines the connection of the automation equipment involved in the configuration of an EMCS point and the final EMCS block diagram documents the detailed wiring based on this. Again, suitable symbols are used when drawing up these EMCS block diagrams to indicate how the so-called standardised signals are used to connect the automation devices deployed.

Core project design – Basic methodology


In practice, process technology, as on the small-scale experimental modules, an automation system, apart from the field instrumentation (sensors/actuators), is dominated by process control and instrumentation technology. These tools for automation are fitted into a basic structure of the automation system, which is universally accepted as a means of reference. This basic configuration comprises the typical components process control console, switchroom and fieldlevel (Picture 1) and clearly sets out the use of the tools for automation, which are important as far as project design is concerned.


Picture 1: Basic structure of an automation system


According to this, it is possible to proceed on the assumption of the following allocation:

>> Process control console ⇒ Processor technology / PLC technology
>> Switchroom ⇒ Measuring transducer technology
>> Process / Field level ⇒ Sensors / Actuators and measuring transducer technology


By recollecting the basic configuration of the single-loop control loop and the binary control system (Picture 2) in this conjunction, it is also possible allocate these in the basic configuration with the help of the automation tools used. This also works for the simple measuring chain (separate measuring point). Finally, it is crucial to define all the EMCS points (electronic measuring and control points) required for the solution of an automation task. As already established, the tender specification or customer’s invitation to tender is generally available for this, on the basis of which the designer (contractor) can draw up the specification.


Picture 2: Automation equipment of a single-loop closed control loop and the binary control system


Tender specification – performance specification


VDI/VDE 3694 formally specifies that the tender specification or performance specification forms the basis of any automation project, i.e. according to VDI/VDE.

The tender specification contains the requirements from the user’s viewpoint, including all parameter conditions "The tender specification defines, WHAT is to be solved and the PURPOSE of the solution ". (The tender specification is drawn up by the customer or commissioned by him. It acts as a basis for the invitation to bid, the quotation and/or contract basis.)

The performance specification contains the tender specification and also details the user tasks and, enlarging on the tender specification, describes the implementation requirements, taking into consideration concrete solution approaches. "The performance specification defines HOW and WITH WHAT the requirements are to be implemented." (The performance specification is generally drawn up by the contractor in cooperation with the customer once the order has been placed.)


In industrial practice, reference is almost always made to the invitation to tender again, which also defines the process technology and the corresponding automation tasks, although generally not to the extent and depth required for the tender specifications as specified in VDI/VDE 3694. It is therefore essential for the contractor (project designer) to give maximum consideration to the planning and calculation of his quotation (performance specification), i.e. contents, size and costs of the automation project to be realised. For a tried and tested practical approach, the project design engineer should therefore start with an analysis and the functional sequence of the respective process technology (evaluation of the process flow diagram, including the corresponding process description).
The process flow diagram for continuous processes is drawn up according to DIN 28004 guidelines and is the diagrammatic representation of the piping and devices. An attached description and additional entries of process parameters in the process flow diagram complete the initial general documentation of the process technology and automation tasks. As such, it becomes necessary to define in detail the automation tasks (EMCS points). This is done by entering the EMCS points in the process flow diagram, i.e. the process flow diagram becomes the PI flow diagram.
The PI flow diagram is therefore the first concrete project step, which defines the number and function of the required EMCS points.

Project design of Automation Systems


Based on the fact that currently engineering training in the field of automation technology is principally dominated by the theory of open and closed loop control, the main purpose of this training concept is to provide would-be practical automation specialists with a sound knowledge of automation methods and project design methods for automation systems. In the sense of holistic training this means that training matters such as the selection and sizing of automation equipment, project design methods, information, electrotechnology, as well as open and closed loop theory must always be taught within a joint context, demonstrated through relevant, practical examples and consolidated by means of practical exercises (learning by doing).


Configuring a small-scale experimental module


Adopting the idea of automating process technology operations as a starting point, the first important point is the question regarding process parameters. By evaluating the experiences gained, typical process parameters such as filling level, throughput, pressure, temperature and quality (pH value) have been incorporated into suitable modules (process technology modules) based on the well-known MPS concept. This means that these modules represent individual process sections and are designed according to a standard structure (Picture 1).


Picture 1: Design of a process technology module


As such, the modules filling level, throughput, pressure, temperature and quality are available for individual use, but can also be combined or duplicated via a central EMCS (Electronic Measuring Control System) terminal and operated as a complex process technology system (Picture 2).


Picture 2: Configuration of the process technology modules


Overview of project design procedure


As already mentioned, the holistic training concept requires the teaching of a sound knowledge of the different training contents typical of automation technology, plus their integration into an effective project design methodology. Picture 3 provides an initial clarification of the extent and technical diversity of the exercises to be completed.


Picture 3: Overview of extent and technical diversity of the basic knowledge involved in the project design of automation systems


The broad knowledge base required for this can only be mastered and put to effective use for project design work by means of a systematic approach (project design know-how). From this viewpoint alone, the small-scale trial station represents an important auxiliary means for the tuition of the necessary training contents and for the development of the required technical and practical competence by means of systematically applying the "learning by doing" concept.
If you now set the task of working through a project design task using the example of this small-scale trial station or an industrial installation in process technology, the project design know-how forms the crucial basis for this. Picture 4 therefore provides an initial introduction of the scope and sequence of the actual project design work in the form of an overview.


Picture 4: Sequence and content of project design work


The starting point of every automation project are the project requirements, which are placed on the automation system. Generally, an invitation to tender is drawn up by the customer for this which, in the sense of the traditional DIN interpretation is characterised by the specification and process flow diagram. The contractor, as a rule the project design company, draws up a proposal (including quotation) and documents the project design work (specification) to be completed via a so-called configurational draft in the form of the PI flow diagram (piping and installation flow diagram).

These tasks are drawn up in the form of a complete set of project documentation by means of the preliminary EMCS block diagrams (electronic measuring control system block diagram) and the final draft (final EMCS block diagrams/wiring lists). The subsequent assembly project design also forms part of the project design task and ensures the assembly of the automation system in the sense of the desired performance range. Finally, some additional tasks need to be fulfilled for the commissioning of this automation system (e.g. specifications for the controller configuration and parameterisation), which form an essential component part of this overall project. Of parallel importance to the project design of this EMCS part, is the implementation of the electrical and the pneumatic and hydraulic project. Picture 4 provides a schematic illustration of the interaction of these three project components.
The core project design now provides a methodology, which sets out the systematic preparation of this broad spectrum of tasks (the core project), and at the same time the linking up with the additional project design tasks (electrical project / pneumatic and hydraulic project). In summary of Picture 4, the core project design (the core project) also encompasses the allocation of the specification, the PI flow diagram and list of EMCS points, the EMCS preliminary block diagrams with the so-called fittings lists and allocation lists, including wiring lists. Moreover, the components System Assembly and Commissioning of the automation system are identified.