NanoPi Neo-Air


The NanoPi NEO Air is a 40 x 40mm open source ARM board for makers. It uses an Allwinner H3 Quad Core A7 processor at 1.2GHz. Its pins are compatible with the NanoPi NEO (V 1.2) and its 24-pin header is compatible with Raspberry Pi's GPIO pin headers. The NanoPi NEO AIR features 512MB of 16bit wide DDR3 RAM, 8GB eMMC and one MicroSD slot. It has WiFi & Bluetooth and DVP camera interface(YUV422). The DVP camera interface can support friendly arm's 5M-pixel camera module. It has enhanced power circuit design and better heat dissipation.


Picture 1: NanoPi NEO-Air Board layout


Features:


  • >> CPU: Allwinner H3, Quad-core Cortex-A7 Up to 1.2 GHz;
  • >> Memory: 512 MB DDR3 RAM;
  • >> Storage: 8 GB/32 GB eMMC;
  • >> WiFi: 802.11b/g/n;
  • >> Bluetooth: 4.0 dual mode;
  • >> MicroSD Slot x 1;
  • >> MicroUSB: OTG and power input;
  • >> DVP Camera interface: 0.5 mm pitch 24-pin FPC seat;
  • >> Debug Serial Port: 4Pin, 2.54 mm pitch pin header;
  • >> Audio Port: 4Pin, 2.54 mm pitch pin header;
  • >> GPIO1: 2.54 mm spacing 24 pin, includes UART, SPI, I2C, GPIO;
  • >> GPIO2: 2.54 mm spacing 12 pin, includes USB x2, IR, SPDIF, I2S;
  • >> PCB Size: 40 x 40 mm;
  • >> PCB layers: 6;
  • >> Power Supply: DC 5 V/ 2 A;
  • >> Weight: 7.5 g (without Pin-headers); 9.7 g (with Pin-headers);
  • >> Working Temperature: -40℃ to 80℃
  • >> OS/Software: u-boot, Ubuntu-Core-Xenial, Debian-Jessie;


More info: NanoPi.

Physiological and Psychological Acoustics


Sense of sound


The ear distinguishes strength, height and color of the sound. The strength of the sound depends on the pressure level. The height of the tone depends on the frequency of the sound. For linear spectrum, the basic (main) harmonic is important.
The musical tone can be high or low, depending on the frequency. The chord can be harmonious (small numbers) and disharmonic (large whole numbers). The color of the sound is determined by the envelope of the linear spectrum. The ear is insensitive on the phase difference between the sound components. In case of noise with continuous spectrum, there is no height of the sound, but there is a color determined by the envelope.

The basic elements of the music are:

>> Melody: the change of the height of the tone;
>> Dynamics: the change of the strength of the sound;
>> Rhythm: successive emphasis.

The characteristics of the sound connected with its movement are: the direction from which sound comes, reverberation and echo.


Hearing aid - Ear


The human organ for hearing, the ear, consists of 3 parts: external, middle and inner ear.
The external ear consists of ear shell and hearing channel. The hearing channel (0.4 cm^2 x 2.5 cm) ends with a sloping membrane (0.8 cm^2). It has good adjustment at 1 kHz. The external ear is turning the acoustics into mechanical oscillations.
The middle ear consists of bones: hammer, anvil and an uplift. It is a mechanical connection between the membrane and the inner ear (transformer). It also protects from excessive sound.
The inner ear has snail body (Kohlea). It's 32 mm long, folded 2.5 times. It consists of window, basilar membrane, lymph, and Corti's organ. For different frequencies the displacement of the basilar membrane is the biggest at different distances from its beginning. On the Corti's organ there are 2350 cells with fibers which end up in nerve fibers as a connection with the brain. The fibers bend and they generating electrical pulses (with maximum frequency of 500 Hz). The connection between the sound and the generated pulses is complex function which is decoded by the brain, in order to create an image for the sound. The both human ears are physiologically independent one from another.


Height of the sound


The height of the sound is determined by its frequency, or by the frequency of the basic harmonic in case of a complex sound. Even when the sound has no basic harmonic, the ear can determine its correct height. The ear listens logarithmic: height of the sound ~ log f.
The hearing range of the ear is from 20 Hz up to 20 kHz. This range covers 10 octaves (16, 31.5, 63, 125, 500, 1k, 2k, 4k, 8k, 16k). One octave has 12 half-tones at musical scale. The difference between two adjacent half-tones is 6%. The ear can determine even less change in the height of the sound. Up to 500 Hz it determines 3 Hz, and above the 500 Hz the difference in determination is df/f = 0.3 %. The ear determines 850 different heights of sound in the whole frequency range. There are 850 places on the basilar membrane with maximal response. These places are displaced from each other at 37 um.


Audible area of the ear


The audible area of the ear is determined by the borders of the strength of the sound. The lower limit or border, it's also known as a hearing threshold. For frequency of 1000 Hz, the pressure is 2 x 10^-5 Pa. The displacement of the molecules is 10^-9 cm. The upper limit is 120 dB and is known as a pain limit:

20log(pmax/p0) = 20log(10^6) = 120 dB


Level of sound


The level of sound in dB has the same value for the pressure and for the sound intensity:

L[dB] = 2log(p/p0)
L[dB] = 2log(J/J0)

J0 = 10^-12 W/m^2 = 10^-6 W/cm^2
p0 = 400 kg/cm^2

The dB unit is good and appropriate because the subjective strength of sound is logarithmic function of pressure (Weber-Fechner law). The sensitivity of the ear is 1 dB.


Subjective strength of sound


The strength of sound expressed in phon:

A[phon] = 20log(p/p0) = 20log(J/J0) at 1 kHz;

The level of sound in dB is equal to the strength of sound in phon for f = 1 kHz. For all other frequencies they are different.

Some examples of the various strengths of sound:

>> Very loud:
- aircraft engine at 3 meters distance - strength of sound: 120 phon;
- compressor at 2 meters distance - strength of sound: 110 phon;
- motor without exhaust at 10 meters distance - strength of sound: 100 phon;

>> Loud:
- a car horn at 5 meters distance - strength of sound: 90 phon;
- strong shouting - strength of sound: 80 phon;

>> Normal:
- urban traffic - strength of sound: 70 phon;
- office - strength of sound: 60 phon;
- normal speech - strength of sound: 50 phon;

>> Calmly:
- silent speech or music - strength of sound: 40 phon;
- quiet apartment - strength of sound: 30 phon;
- peaceful garden - strength of sound: 20 phon;
- leafing - strength of sound: 10 phon;


Sound Volume


The phon scale doesn't show the right way of how the ear determines the subjective strength of sound. The volume is better unit for subjective strength of sound. The unit meter for volume is "sone".

S[sone] = 2^(0.1*(A - 40)), where A is expressed in phon;

It is arbitrarily selected that: 1 Sone = 40 Phon. The Sone scale is experimentally confirmed.

3PE Systems Calculator


Electro-Magnetic World and BMG Universe created simple, but very useful tool for electrical engineers, a 3PE Calculator. This program provides the basic information for design and configuration of 3-phase electrical (3PE) systems. Depending on power consumption of the consumer (EM motor), the program provides information for selecting proper cable, fuses, current transformer (CT) for measurement purposes, contactors for operating with the load and motor protectors for over-current protection of the motors.


3PE Systems Calculator 1.0 is program that provides useful information for designing and implementation of 3PE Systems. The calculations are made for 3-phase asynchronous EM motors as consumers in the systems, but they can also be used and for any other type of 3-phase load consumer.


IMPORTANT NOTE: This program only provides useful information for creating and design of the 3PE systems. The calculations and predictions that are made here are clearly highlighted, and if you make any kind of mistake in your design using this program we take NO RESPONSIBILITY at all !

______________________________


About System A


System A is 3PE system for direct start of 3-phase asynchronous EM motors (4-pole). Also, there is an option for forward-reverse mode of operation of the EM motors. The one-pole schematic of the system A is shown on Picture 1. In case of forward-reverse mode of operation, instead of contactor C1, the both contactors C1 and C2 are in use, as is shown on the one-pole schematic of the System A. The contactors C1 and C2 are of the same type.


Picture 1: 3PE System A - One-pole schematic


There are 30 standard values for nominal power of EM motor, starting from 0.18 kW up to 200 kW. You can choose each one of them, and the program will provide proper information for the parameters you need for design and implementation of the selected System A.

The section of the cables is approximately calculated for the voltage drop less than 2% up to 80 meters distance (from the connection to the consumer).


Note: For direct start of the EM motor, it's consider that the peak current at the start up is about 6 times greater than the nominal current of the EM motor (Ip = 6*In). The time required for the motor to achieve its momentum is about 5 seconds (tm = 5s).


Important!

For more precise calculations for the section of the cable depending on the allowed voltage drop for the given distance and the control of the heating of the cable you need to choose the proper formulas to recalculate this.


About System B


System B is a 3PE system for star-delta (Y-D) starting of 3-phase asynchronous EM motors (4-pole), or using the soft starter or frequency regulator for starting the motor. In this system there are 3 contactors in use, as is shown on the one-pole schematic of the System B on Picture 2. The contactor C1 brings the 3 phases to the motor. The contactor C2 creates delta connection of the motor, and the contactor C3 creates star connection. The contactors C1 and C2 are the same type, and contactor C3 can be the same type or one class lower from C1 and C2, because the current in that circuit is lower.


Picture 2: 3PE System B - One-pole schematic


There are 30 standard values for nominal power of EM motor, starting from 0.55 kW up to 355 kW. You can choose each one of them, and the program will provide proper information for the parameters you need for design and implementation of the selected System B.

The section of the cables is approximately calculated for the voltage drop less than 2% up to 80 meters distance (from the connection to the consumer).


Note: For star - delta starting of the EM motor, it's consider that the peak current at the start up is about 2 times greater than the nominal current of the EM motor (Ip = 2*In). The time required for the motor to achieve its momentum is about 15 seconds (tm = 15s). And also, here is important to have "dead time" between the star and delta connection. That means that when the star connection is switch off, the motor should have no voltage for short time interval (dead time) before the delta connection is switched on. This dead time is about 100 miliseconds (td = 100 ms), and is easy to achieve with proper time relay.


Important!

For more precise calculations for the section of the cable depending on the allowed voltage drop for the given distance and the control of the heating of the cable you need to choose the proper formulas to recalculate this.


Info for the manufacturers


There are 2 manufacturers for contactors and motor protectors used in this program:


>> RADE KONCAR

The KONCAR contactors used in this program are CNM series contactors, and the motor protectors (thermal overload relays) are TRM series relays from KONCAR. You can find more information on KONCAR's site: Rade KONCAR


>> SIEMENS

The Siemens contactors used in this program are 3RT series contactors, and the motor protectors are 3RV Siemens Sirius Motor starter protectors series. You can find more information on Siemens's site: Siemens


Free Download of 3PE Calculator Android version


Finaly, this simple and useful tool can be downloaded for free on the Google Play store: 3PE Systems Calculator 1.0

Motors Mounting


NEMA Dimensions


NEMA has standardized motor dimensions for a range of frame sizes. Standardized dimensions include bolt hole size, mounting base dimensions, shaft height, shaft diameter, and shaft length. Use of standardized dimensions allows existing motors to be replaced without reworking the mounting arrangement. In addition, new installations are easier to design because the dimensions are known. Standardized dimensions include letters to indicate the dimension’s relationship to the motor. For example, the letter C indicates the overall length of the motor and the letter E represents the distance from the center of the shaft to the center of the mounting holes in the feet (Picture 1). Dimensions are found by referring to a table in the motor data sheet and referencing the letter to find the desired dimension.


Picture 1: Motor dimensions


NEMA divides standard frame sizes into two categories, fractional horsepower and integral horsepower. The most common frame sizes for fractional horsepower motors are 42, 48, and 56. Integral horsepower motors are designated by frame sizes 143 and above. A T in the motor frame size designation for an integral horsepower motor indicates that the motor is built to current NEMA frame standards. Motors that have a U in their motor frame size designation, are built to NEMA standards that were in place between 1952 and 1964.

The frame size designation is a code to help identify key frame dimensions. The first two digits are used to determine the shaft height. The shaft height is the distance from the center of the shaft to the mounting surface. To calculate the shaft height, divide the first two digits of the frame size by 4. For example, a 143T frame size motor (Picture 2) has a shaft height of 3½ inches (14 ÷ 4).


Picture 2: 143T frame size motor


The third digit in the integral T frame size number is the NEMA code for the distance between the center lines of the motor feet mounting bolt holes. The distance is determined by matching this digit with a table in NEMA publication MG-1 (Picture 4). For example, the distance between the center lines of the mounting bolt holes in the feet of a 143T frame is 4.00 inches (Picture 3).


Picture 3: Distance between the bolt holes


Picture 4: Distance between the bolt holes table


IEC Dimensions


IEC also has standardized dimensions, but these dimensions differ from NEMA standards. An example of the IEC dimensions are shown in the following drawing on Picture 5.


Picture 5: IEC Dimensions


Mounting Positions


The typical floor mounting positions are illustrated in the following drawing on Picture 6, and are referred to as F-1 and F-2 mountings. The conduit box can be located on either side of the frame to match the mounting arrangement and position. The standard location of the conduit box is on the left-hand side of the motor when viewed from the shaft end. This is referred to as the F-1 mounting. The conduit opening can be placed on any of the four sides of the box by rotating the box in 90° steps.


Picture 6: F-1 and F-2 mountings


With modification, a foot-mounted motor can be mounted on a wall and ceiling. Typical wall and ceiling mounts are shown in the following illustration on Picture 7. Wall mounting positions have the prefix W and ceiling mounted positions have the prefix C.


Picture 7: Typical wall and ceiling mounts (W & C)


Mounting Faces


It is sometimes necessary to connect the motor directly to the equipment it drives. In the following example (Picture 8) a motor is connected directly to a gear box.


Picture 8: Motor connected to a gear box


C-face Motor


The face, or the end, of a C-face motor has threaded bolt holes. Bolts to mount the motor pass through mating holes in the equipment and into the face of the motor (Picture 9).


Picture 9: C-face motor


D-flange Motor


The bolts go through the holes in the flange of a D-flange motor and into threaded mating holes of the equipment (Picture 10).


Picture 10: D-flange motor

Motor Enclosures


A motor’s enclosure not only holds the motors components together, it also protects the internal components from moisture and containments. The degree of protection depends on the enclosure type. In addition, the type of enclosure affects the motor’s cooling. There are two categories of enclosures: open and totally enclosed.


Open Drip Proof (ODP) Enclosure


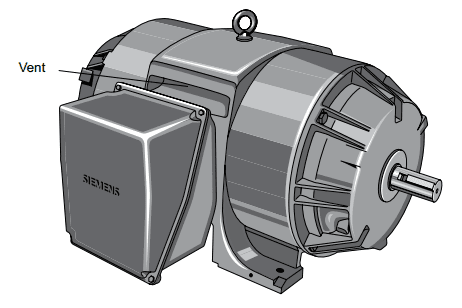
Open enclosures permit cooling air to flow through the motor. One type of open enclosure is the open drip proof (ODP) enclosure (Picture 1). This enclosure has vents that allow for air flow. Fan blades attached to the rotor move air through the motor when the rotor is turning. The vents are positioned so that liquids and solids falling from above at angles up to 15° from vertical cannot enter the interior of the motor when the motor is mounted on a horizontal surface. When the motor is mounted on a vertical surface, such as a wall or panel, a special cover may be needed. ODP enclosures should be used in environments free from contaminates.


Picture 1: ODP Enclosure


Totally Enclosed Non-Ventilated (TENV) Enclosure


In some applications, the air surrounding the motor contains corrosive or harmful elements which can damage the internal parts of a motor. A totally enclosed non-ventilated (TENV) motor enclosure limits the flow of air into the motor, but is not airtight (Picture 2). However, a seal at the point where the shaft passes through the housing prevents water, dust, and other foreign matter from entering the motor along the shaft. Most TENV motors are fractional horsepower. However, integral horsepower TENV motors are used for special applications. The absence of ventilating openings means that all the heat from inside the motor must dissipate through the enclosure by conduction. These larger horsepower TENV motors have an enclosure that is heavily ribbed to help dissipate heat more quickly. TENV motors can be used indoors or outdoors.


Picture 2: TENV Enclosure


Totally Enclosed Fan Cooled (TEFC) Enclosure


A totally enclosed fan-cooled (TEFC) motor is similar to a TENV motor, but has an external fan mounted opposite the drive end of the motor (Picture 3). The fan blows air over the motor’s exterior for additional cooling. The fan is covered by a shroud to prevent anyone from touching it. TEFC motors can be used in dirty, moist, or mildly corrosive environments.


Picture 3: TEFC Enclosure


Explosion Proof (XP)


Hazardous duty applications are commonly found in chemical processing, mining, foundry, pulp and paper, waste management, and petrochemical industries. In these applications, motors have to comply with the strictest safety standards for the protection of life, machines and the environment. This often requires use of explosion proof (XP) motors. An XP motor is similar in appearance to a TEFC motor, however, most XP enclosures are cast iron (Picture 4). In the United States, the application of motors in hazardous locations is subject to National Electrical Code® and standards set by Underwriters Laboratories and various regulatory agencies.


Picture 4: XP Enclosure


Hazardous (Classified) Locations


You should never specify or suggest the type of hazardous location classification, it is the user’s responsibility to comply with all applicable codes and to contact local regulatory agencies to define hazardous locations. Refer to the National Electrical Code®Article 500 for additional information.


Division I and II Locations


Division I locations normally have hazardous materials present in the atmosphere. Division II locations may have hazardous material present in the atmosphere under abnormal conditions.


Classes and Groups


Locations defined as hazardous, are further defined by the class and group of hazard. For example, Class I, Groups A through D have gases or vapors present. Class II, Groups E, F, and G have flammable dust, such as coke or grain dust. Class III is not divided into groups. This class involves ignitable fibers and lints (Picture 5).


Picture 5: Classes and Groups table

Matching Motors to the Load


One way to evaluate whether the torque capabilities of a motor meet the torque requirements of the load is to compare the motor’s speed-torque curve with the speed-torque requirements of the load (Picture 1).


Picture 1: Speed-torque curve of the motor and speed-torque requirements of the load


Load Characteristics Tables


A table, like one shown on Picture 2 below, can be used to find the load torque characteristics. NEMA publication MG 1 is one source of typical torque characteristics.


Picture 2: Load torque characteristics table (example)


Calculating Load Torque


The most accurate way to obtain torque characteristics of a given load is from the equipment manufacturer. However, the following procedure illustrates how load torque can be determined. The following illustration on Picture 3 shows a pulley fastened to the shaft of a load. A cord is wrapped around the pulley with one end connected to a spring scale. Pull on the scale until the shaft turns and note the force reading on the scale. Then, multiply the force required to turn the shaft by the radius of the pulley to calculate the torque value. Keep in mind that the radius is measured from the center of the shaft.


Picture 3: Load torque measurement


For example, if the radius of the pulley is 1 foot and the force required to turn the shaft is 10 pounds, the torque requirement is 10 lb-ft. Remember that this is just the required starting torque. The amount of torque required to turn the load can vary with speed. At any point on the speed-torque curve, the amount of torque produced by a motor must always at least equal the torque required by its load. If the motor cannot produce sufficient torque, it will either fail to start the load, stall, or run in an overloaded condition. This will probably cause protective devices to trip and remove the motor from the power source.


Centrifugal Pump


In the following example (Picture 4), a centrifugal pump requires a full-load torque of 600 lb-ft. This pump only needs approximately 20% of full-load torque to start. The required torque dips slightly as the load begins to accelerate and then increases to full-load torque as the pump comes up to speed. This is an example of a variable torque load.


Picture 4: Speed-torque curve for centrifugal pump


The motor selected in this example is a NEMA B motor that is matched to the load. In other words, motor has sufficient torque to accelerate the load to rated speed.


Screw Down Actuator


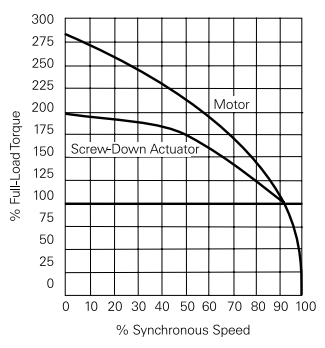
In the following example (Picture 5), the load is a screw down actuator with a starting torque equal to 200% of full-load torque. Note that the NEMA B motor chosen for this example does not provide sufficient torque to start the load.


Picture 5: Speed-torque curve for screw down actuator


One solution to this problem is to use a higher horsepower NEMA B motor. A less expensive solution might be to use a NEMA D motor which has higher starting torque for the same horsepower rating (Picture 6).


Picture 6: Speed-torque curve of motor sufficient for screw down actuator

AC Motors and AC Drives


Many applications require the speed of an AC motor to vary. The easiest way to vary the speed of an AC induction motor is to use an AC drive to vary the applied frequency. Operating a motor at other than the rated frequency and voltage affect both motor current and torque.


Volts per Hertz (V/Hz) Ratio


The volts per hertz (V/Hz) ratio is the ratio of applied voltage to applied frequency for a motor. 460 VAC is the most common voltage rating for an industrial AC motor manufactured for use in the United States. These motors have a frequency rating of 60Hz. This provides a V/Hz ratio of 7.67. Not every motor has a 7.67 V/Hz ratio. A 230 Volt, 60 Hz motor, for example, has a 3.8 V/Hz ratio.


Constant Torque Operation


AC motors running on an AC line operate with a constant flux because voltage and frequency are constant. Motors operated with constant flux are said to have constant torque. Actual torque produced, however, is dependent upon the load. An AC drive is capable of operating a motor with constant flux from approximately 0 Hz to the motor’s rated nameplate frequency (typically 60 Hz). This is the constant torque range. As long as a constant volts per hertz ratio is maintained the motor will have constant torque characteristics.

The following graphs shown on Picture 1 illustrate the constant volts per hertz ratio of a 460 volt, 60 Hz motor and a 230 volt, 60 Hz motor operated over the constant torque range. Keep in mind that if the applied frequency increases, stator reactance increases. In order to compensate for this, the drive must simultaneously increase voltage proportionally. Otherwise, stator current, flux, and torque would decrease.


Picture 1: Volts per Hertz ratio graphs


Constant Horsepower


Some applications require the motor to be operated above base speed. Because applied voltage must not exceed the rated nameplate voltage, torque decreases as speed increases. This is referred to as the constant horsepower range because any change in torque is compensated by the opposite change in speed.

Power[HP] = (Torque[lb-ft] x Speed[RPM]) / 5252

If the motor is operated in both the constant torque and constant horsepower ranges, constant volts per hertz and torque are maintained up to 60 Hz. Above 60 Hz, the volts per hertz ratio decreases, with a corresponding decrease in torque (Picture 2).


Picture 2: Volts per Hertz ratio decreases above the main operating frequency


Reduced Voltage and Frequency Starting


Recall that when a NEMA B motor is started at full voltage, it develops approximately 150% starting torque and 600% starting current. When the motor is controlled by an AC drive, the motor is started at reduced voltage and frequency. For example, the motor may start with approximately 150% torque, but only 150% of full load current. As the motor is brought up to speed, voltage and frequency are increased, and this has the effect of shifting the motor’s speed-torque curve to the right. The dotted lines on the following speed-torque curve represent the portion of the curve not used by the drive (Picture 3). The drive starts and accelerates the motor smoothly as frequency and voltage are gradually increased to the desired speed.


Picture 3: Speed-Torque curve


Some applications require higher than 150% starting torque. A conveyor, for example, may require 200% rated torque for starting. This is possible if the drive and motor are appropriately sized.


Selecting a Motor


AC drives often have more capability than the motor. Drives can run at higher frequencies than may be suitable for an application. In addition, drives can run at speeds too low for self-cooled motors to develop sufficient air flow. Each motor must be evaluated according to its own capability before selecting it for use on an AC drive.
Harmonics, voltage spikes, and voltage rise times of AC drives are not identical. Some AC drives have more sophisticated filters and other components designed to minimize undesirable heating and insulation damage to the motor. This must be considered when selecting an AC drive/motor combination.


Distance Between the Drive and the Motor


Distance from the drive to the motor must also be taken into consideration. All motor cables have line-to-line and line-to-ground capacitance. The longer the cable, the greater the capacitance. Some types of cables, such as shielded cable or cables in metal conduit, have greater capacitance. Spikes occur on the output of AC drives because of the charging current in the cable capacitance. Higher voltage (460 VAC) and higher capacitance (long cables) result in higher current spikes. Voltage spikes caused by long cable lengths can potentially shorten the life of the AC drive and motor.

Service Factor on AC Drives


A high efficiency motor with a 1.15 service factor is recommended when used with an AC drive. Due to heat associated with harmonics of an AC drive, the 1.15 service factor is reduced to 1.0.