Derating Factors for AC Motors


Several factors can affect the performance of an AC motor. These must be considered when applying a motor.


Voltage Variation


As previously discussed, AC motors have a rated voltage and frequency. Some motors have connections for more that one rated voltage. The following table on Picture 1 shows the most common voltage ratings for NEMA motors.


Picture 1: Standardized voltages and frequencies


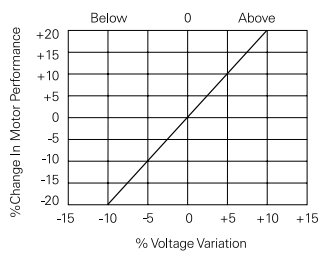
A small variation in supply voltage can have a dramatic affect on motor performance. In the following chart shown on Picture 2, for example, when voltage is 10% below the rated voltage of the motor, the motor has 20% less starting torque. This reduced voltage may prevent the motor from getting its load started or keeping it running at rated speed. A 10% increase in supply voltage, on the other hand, increases the starting torque by 20%. This increased torque may cause damage during startup. A conveyor, for example, may lurch forward at startup. A voltage variation also causes similar changes in the motor’s starting and full-load currents and temperature rise.


Picture 2: Change in motor performance with voltage variation


Frequency


A variation in the frequency at which the motor operates causes changes primarily in speed and torque characteristics. A 5% increase in frequency, for example, causes a 5% increase in full-load speed and a 10% decrease in torque (Picture 3).


Picture 3: Frequency variation effects


Altitude


Standard motors are designed to operate below 3300 feet. Air is thinner, and heat is not dissipated as quickly above 3300 feet. Most motors must be derated for altitudes above 3300 feet. The following chart on Picture 4 shows typical horsepower derating factors, but the derating factor should be checked for each motor. A 50 HP motor operated at 6000 feet, for example, would be derated to 47 HP, providing the 40°C ambient rating is still required.


Picture 4: Altitude derating factor


Ambient Temperature


The ambient temperature may also have to be considered. The ambient temperature requirement may be reduced from 40°C to 30°C at 6600 feet on many motors. However, a motor with a higher insulation class may not require derating in these conditions (Picture 5).


Picture 5: Ambient temperature reduces with altitude


NEMA Motor Characteristics


Standard Motor Designs


Motors are designed with speed-torque characteristics to match the requirements of common applications. The four standard NEMA motor designs, A, B, C, and D, have different characteristics. This article provides descriptions for each of these motor designs with emphasis on NEMA design B, the most common three-phase AC induction motor design.


Speed-Torque Curve for NEMA B Motor


Because motor torque varies with speed, the relationship between speed and torque is often shown in a graph, called a speed-torque curve. This curve shows the motor’s torque, as a percentage of full-load torque, over the motor’s full speed range, shown as a percentage of its synchronous speed. The following speed-torque curve shown on Picture 1 is for a NEMA B motor. NEMA B motors are general purpose, single speed motors suited for applications that require normal starting and running torque, such as fans, pumps, lightly-loaded conveyors, and machine tools. Using a 30 HP, 1765 RPM NEMA B motor as an example, full-load torque can be calculated by transposing the formula for horsepower:

HP = (Torque[lb-ft] x Speed[RPM])/5252 => Torque = 89.3 lb-ft


Picture 1: NEMA B Motor speed-torque curve


Starting Torque


Starting torque, also referred to as locked rotor torque, is the torque that the motor develops each time it is started at rated voltage and frequency. When voltage is initially applied to the motor’s stator, there is an instant before the rotor turns. At this instant, a NEMA B motor develops a torque approximately equal to 150% of full-load torque. For the 30 HP, 1765 RPM motor used in this example, that’s equal to 134.0 lb-ft of torque (Picture 2).


Picture 2: Starting torque


Pull-up Torque


As the motor picks up speed, torque decreases slightly until point B on the graph is reached (Picture 3). The torque available at this point is called pull-up torque. For a NEMA B motor, this is slightly lower than starting torque, but greater than full-load torque.


Breakdown Torque


As speed continues to increase from point B to point C (see Picture 3), torque increases up to a maximum value at approximately 200% of full-load torque. This maximum value of torque is referred to as breakdown torque. The 30 HP motor in this example has a breakdown torque of approximately 178.6 lb-ft.


Picture 3: Pull-up and Breakdown torque


Full-Load Torque


Torque decreases rapidly as speed increases beyond breakdown torque until it reaches full-load torque at a speed slightly less than 100% of synchronous speed (Picture 4). Full-load torque is developed with the motor operating at rated voltage, frequency, and load. The motor in this example has a synchronous speed of 1800 RPM and a full-load speed of 1765 RPM. Therefore, its slip is 1.9%.


Picture 4: Full-load torque


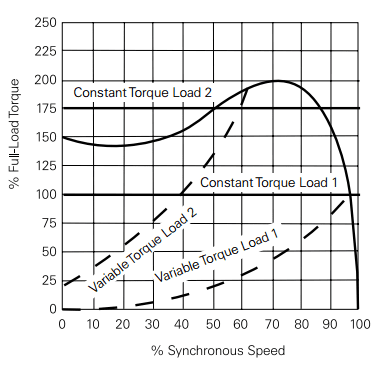
Speed-torque curves are useful for understanding motor performance under load. The following speed-torque curve on Picture 5 shows four load examples. This motor is appropriately sized for constant torque load 1 and variable torque load 1. In each case, the motor will accelerate to its rated speed. With constant torque load 2, the motor does not have sufficient starting torque to turn the rotor. With variable torque load 2, the motor cannot reach rated speed. In these last two examples, the motor will most likely overheat until its overload relay trips.


Picture 5: Constant and variable torque loads


Starting Current and Full-Load Current


Starting current, also referred to as locked rotor current, is the current supplied to the motor when the rated voltage is initially applied with the rotor at rest (Picture 6). Full-load current is the current supplied to the motor with the rated voltage, frequency, and load applied and the rotor up to speed. For a NEMA B motor, starting current is typically 600-650% of full-load current. Knowledge of the current requirements for a motor is critical for the proper application of over-current protection devices.


Picture 6: Starting and Full-load current


NEMA A Motor


NEMA A motors are the least common design. NEMA A motors have a speed-torque curve similar to that of a NEMA B motor, but typically have higher starting current. As a result, overcurrent protection devices must be sized to handle the increased current. NEMA A motors are typically used in the same types of applications as NEMA B motors.


NEMA C Motor


NEMA C motors are designed for applications that require a high starting torque for hard to start loads, such as heavily-loaded conveyors, crushers and mixers. Despite the high starting torque, these motors have relatively low starting current. Slip and full-load torque are about the same as for a NEMA B motor. NEMA C motors are typically single speed motors which range in size from approximately 5 to 200 HP. The following speed-torque curve shown on Picture 7 is for a 30 HP NEMA C motor with a full-load speed of 1765 RPM and a full-load torque of 89.3 lb-ft. In this example, the motor has a starting torque of 214.3 lb-ft, 240% of full-load torque and a breakdown torque of 174 lb-ft.


Picture 7: NEMA C Motor speed-torque curve


NEMA D Motor


The starting torque of a NEMA design D motor is approximately 280% of the motor’s full-load torque. This makes it appropriate for very hard to start applications such as punch presses and oil well pumps. NEMA D motors have no true breakdown torque. After starting, torque decreases until full-load torque is reached. Slip for NEMA D motors ranges from 5 to 13%.
The following speed torque curve shown on Picture 8 is for a 30 HP NEMA D motor with a full-load speed of 1656 RPM and a full load torque of 95.1 lb-ft. This motor develops approximately 266.3 lb-ft of starting torque.


Picture 8: NEMA D Motor speed-torque curve

Motor Specifications


Nameplate


The nameplate of a motor provides important information necessary for proper application. For example, the following illustration on Picture 1 shows the nameplate of a 30 horsepower (HP) three-phase (3 PH) AC motor. The following paragraphs explain some of the other nameplate information for this motor.


Picture 1: Nameplate of motor (example)


Voltage Source (VOLTS) and Full-load Current (AMPS)


AC motors are designed to operate at standard voltages. This motor is designed to be powered by a three-phase 460 V supply. Its rated full-load current is 35.0 A.


Base Speed (RPM) and Frequency (HERTZ)


Base speed is the speed, given in RPM, at which the motor develops rated horsepower at rated voltage and frequency. Base speed is an indication of how fast the output shaft will turn the connected equipment when fully loaded. This motor has a base speed of 1775 RPM at a rated frequency of 60 Hz. Because the synchronous speed of a 4-pole motor operated at 60 Hz is 1800 RPM, the full-load slip in this case is 1.4%. If the motor is operated at less than full load, the output speed will be slightly greater than the base speed.


Service Factor


Service factor is a number that is multiplied by the rated horsepower of the motor to determine the horsepower at which the motor can be operated. Therefore, a motor designed to operate at or below its nameplate horsepower rating has a service factor of 1.0.
Some motors are designed for a service factor higher than 1.0, so that they can, at times, exceed their rated horsepower For example, this motor has a service factor of 1.15. A 1.15 service factor motor can be operated 15% higher than its nameplate horsepower. Therefore this 30 HP motor can be operated at 34.5 HP. Keep in mind that any motor operating continuously above its rated horsepower will have a reduced service life.


Insulation Class


NEMA defines motor insulation classes to describe the ability of motor insulation to handle heat. The four insulation classes are A, B, F, and H. All four classes identify the allowable temperature rise from an ambient temperature of 40° C (104° F). Classes B and F are the most commonly used. Ambient temperature is the temperature of the surrounding air. This is also the temperature of the motor windings before starting the motor, assuming the motor has been stopped long enough. Temperature rises in the motor windings as soon as the motor is started. The combination of ambient temperature and allowed temperature rise equals the maximum rated winding temperature. If the motor is operated at a higher winding temperature, service life will be reduced. A 10° C increase in the operating temperature above the allowed maximum can cut the motor’s insulation life expectancy in half. The following illustration on Picture 2 shows the allowable temperature rise for motors operated at a 1.0 service factor at altitudes no higher than 3300 ft. Each insulation class has a margin allowed to compensate for the motor’s hot spot, a point at the center of the motor’s windings where the temperature is higher. For motors with a service factor of 1.15, add 10° C to the allowed temperature rise for each motor insulation class.


Picture 2: The allowable temperature rise for motors per class, operated at a 1.0 service factor

The motor in this example has insulation class F and a service factor of 1.15. This means that its winding temperature is allowed to rise to 155° C with an additional 10° C hot spot allowance.


NEMA Motor Design


NEMA also uses letters (A, B, C, and D) to identify motor designs based on torque characteristics. The motor in this example is a design B motor, the most common type. Motor design A is the least common type.


Motor Efficiency


Motor efficiency is a subject of increasing importance, especially for AC motors. AC motor efficiency is important because AC motors are widely used and account for a significant percentage of the energy used in industrial facilities. Motor efficiency is the percentage of the energy supplied to the motor that is converted into mechanical energy at the motor’s shaft when the motor is continuously operating at full load with the rated voltage applied. Because motor efficiencies can vary among motors of the same design, the NEMA nominal efficiency percentage on the nameplate is representative of the average efficiency for a large number of motors of the same type. The motor in this example has a NEMA nominal efficiency of 93.6%.
Both NEMA and the Energy Policy Act of 1992 (EPAct) specify the same process for testing motor efficiency. In 2001, NEMA established the NEMA Premium designation for three-phase AC motors that meet even higher efficiency standards than required by EPAct. More recently, the Energy Independence and Security Act of 2007 (EISA) was passed. EISA requires most motors manufactured after December 19, 2010 to meet NEMA Premium efficiency levels. This includes motors previously covered by EPAct and some additional categories of motors.
Siemens NEMA Premium Efficient motors meet NEMA Premium efficiency standards and Siemens Ultra Efficient motors with exclusive die cast copper rotor technology exceed NEMA Premium efficiency standards.

Rotor Rotation


Permanent Magnet


To see how a rotor works, a magnet mounted on a shaft can be substituted for the squirrel cage rotor. When the stator windings are energized, a rotating magnetic field is established. The magnet has its own magnetic field that interacts with the rotating magnetic field of the stator. The north pole of the rotating magnetic field attracts the south pole of the magnet, and the south pole of the rotating magnetic field attracts the north pole of the magnet (Picture 1). As the magnetic field rotates, it pulls the magnet along. AC motors that use a permanent magnet for a rotor are referred to as permanent magnet synchronous motors. The term synchronous means that the rotors rotation is synchronized with the magnetic field, and the rotor’s speed is the same as the motor’s synchronous speed.


Picture 1: The rotating magnetic field of the stator


Induced Voltage Electromagnet


Instead of a permanent magnet rotor, a squirrel cage induction motor induces a current in its rotor, creating an electromagnet. As the following illustration on Picture 2 shows, when current is flowing in a stator winding, the electromagnetic field created cuts across the nearest rotor bars.


Picture 2: Rotor as electromagnet


When a conductor, such as a rotor bar, passes through a magnetic field, a voltage (emf) is induced in the conductor. The induced voltage causes current flow in the conductor. In a squirrel cage rotor, current flows through the rotor bars and around the end ring and produces a magnetic field around each rotor bar. Because the stator windings are connected to an AC source, the current induced in the rotor bars continuously changes and the squirrel cage rotor becomes an electromagnet with alternating north and south poles (Picture 3).


Picture 3: Squirrel cage rotor as electromagnet


The following illustration on Picture 4 shows an instant when winding A1 is a north pole and its field strength is increasing. The expanding field cuts across an adjacent rotor bar, inducing a voltage. The resultant current flow in one rotor bar produces a south pole. This causes the motor to rotate towards the A1 winding. At any given point in time, the magnetic fields for the stator windings are exerting forces of attraction and repulsion against the various rotor bars. This causes the rotor to rotate, but not exactly at the motor’s synchronous speed.


Picture 4: Rotation of the motor


Slip


For a three-phase AC induction motor, the rotating magnetic field must rotate faster than the rotor to induce current in the rotor. When power is first applied to the motor with the rotor stopped, this difference in speed is at its maximum and a large amount of current is induced in the rotor. After the motor has been running long enough to get up to operating speed, the difference between the synchronous speed of the rotating magnetic field and the rotor speed is much smaller. This speed difference is called slip. Slip is necessary to produce torque. Slip is also dependent on load. An increase in load causes the rotor to slow down, increasing slip. A decrease in load causes the rotor to speed up, decreasing slip. Slip is expressed as a percentage and can be calculated using the following formula:

% Slip = (NS - NR)/NS x 100

For example, a four-pole motor operated at 60 Hz has a synchronous speed (NS) of 1800 RPM. If its rotor speed (NR) at full load is 1775 RPM, then its full load slip is 1.4%.


Wound Rotor Motor


The discussion to this point has been centered on the more common squirrel cage rotor. Another type of three-phase induction motor is the wound rotor motor. A major difference between the wound rotor motor and the squirrel cage rotor is that the conductors of the wound rotor consist of wound coils instead of bars. These coils are connected through slip rings and brushes to external variable resistors (Picture 5). The rotating magnetic field induces a voltage in the rotor windings. Increasing the resistance of the rotor windings causes less current to flow in the rotor windings, decreasing rotor speed. Decreasing the resistance causes more current to flow, increasing rotor speed.


Picture 5: Wound rotor motor


Synchronous Motor


Another type of three-phase AC motor is the synchronous motor. The synchronous motor is not an induction motor. One type of synchronous motor is constructed somewhat like a squirrel cage rotor. In addition to rotor bars, coil windings are also used. The coil windings are connected to an external DC power supply by slip rings and brushes (Picture 6). When the motor is started, AC power is applied to the stator, and the synchronous motor starts like a squirrel cage rotor. DC power is applied to the rotor coils after the motor has accelerated. This produces a strong constant magnetic field in the rotor which locks the rotor in step with the rotating magnetic field. The rotor therefore turns at synchronous speed, which is why this is a synchronous motor. As previously mentioned, some synchronous motors use a permanent magnet rotor. This type of motor does not need a DC power source to magnetize the rotor.


Picture 6: Synchronous motor

Developing a Rotating Magnetic Field


The principles of electromagnetism explain the shaft rotation of an AC motor. Recall that the stator of an AC motor is a hollow cylinder in which coils of insulated wire are inserted (Picture 1).


Picture 1: Stator of AC motor


Stator Coil Arrangement


The following diagram on Picture 2 shows the electrical configuration of stator windings. In this example, six windings are used, two for each of the three phases. The coils are wound around the soft iron core material of the stator. When current is applied, each winding becomes an electromagnet, with the two windings for each phase operating as the opposite ends of one magnet. In other words, the coils for each phase are wound in such a way that, when current is flowing, one winding is a north pole and the other is a south pole. For example, when A1 is a north pole, A2 is a south pole and, when current reverses direction, the polarities of the windings also reverse.


Picture 2: Stator coil configuration


Stator Power Source


The stator is connected to a three-phase AC power source. The following illustration on Picture 3 shows windings A1 and A2 connected to phase A of the power supply. When the connections are completed, B1 and B2 will be connected to phase B, and C1 and C2 will be connected to phase C.


Picture 3: Stator connected to phase A of a three-phase source


As the following illustration shows, coils A1, B1, and C1 are 120° apart. Note that windings A2, B2, and C2 also are 120° apart. This corresponds to the 120° separation between each electrical phase. Because each phase winding has two poles, this is called a two-pole stator (Picture 4).


Picture 4: 2-pole stator windings


When AC voltage is applied to the stator, the magnetic field developed in a set of phase coils depends on the direction of current flow. Refer to the following chart shown on Picture 5 as you read the explanation of how a rotating magnetic field is developed. This chart assumes that a positive current flow in the A1, B1 or C1 windings results in a north pole.


Picture 5: Current flow direction chart


Start


In the following illustration shown on Picture 6, a start time has been selected during which phase A has no current flow and its associated coils have no magnetic field. Phase B has current flow in the negative direction and phase C has current flow in the positive direction. Based on the previous chart, B1 and C2 are south poles and B2 and C1 are north poles. Magnetic lines of flux leave the B2 north pole and enter the nearest south pole, C2. Magnetic lines of flux also leave the C1 north pole and enter the nearest south pole, B1. The vector sum of the magnetic fields is indicated by the arrow.


Picture 6: Start of a motor - diagram


Time 1


The following chart on Picture 7 shows the progress of the magnetic field vector as each phase has advanced 60°. Note that at time 1 phase C has no current flow and no magnetic field is developed in C1 and C2. Phase A has current flow in the positive direction and phase B has current flow in the negative direction. As the previous chart shows, windings A1 and B2 are north poles and windings A2 and B1 are south poles. The resultant magnetic field vector has rotated 60° in the clockwise direction.


Picture 7: Time 1 diagram


Time 2


At time 2 (Picture 8), phase B has no current flow and windings B1 and B2 have no magnetic field. Current in phase A is flowing in the positive direction, but phase C current is now flowing in the negative direction. The resultant magnetic field vector has rotated another 60°.


Picture 8: Time 2 diagram


360° Rotation


At the end of six such time intervals, the magnetic field will have rotated one full revolution or 360° (Picture 9). This process repeats 60 times a second for a 60 Hz power source.


Picture 9: 360° Rotation diagram


Synchronous Speed


The speed of the rotating magnetic field is referred to as the synchronous speed (NS) of the motor. Synchronous speed is equal to 120 times the frequency (f), divided by the number of motor poles (P):

NS = 120 * f / P

The synchronous speed for a two-pole motor operated at 60 Hz, for example, is 3600 RPM.

Synchronous speed decreases as the number of poles increases. The following table on Picture 10 shows the synchronous speed at 60 Hz for several different pole numbers.


Picture 10: Synchronous speed at 60 Hz for different pole numbers

Magnetism and Electromagnetism


Magnetism


The principles of magnetism play an important role in the operation of an AC motor. Therefore, in order to understand motors, you must understand magnets. To begin with, all magnets have two characteristics. They attract iron and steel objects, and they interact with other magnets. This later fact is illustrated by the way a compass needle aligns itself with the Earth’s magnetic field (Picture 1).


Picture 1: Magnetism


Magnetic Lines of Flux


The force that attracts an iron or steel object has continuous magnetic field lines, called lines of flux, that run through the magnet, exit the north pole, and return through the south pole. Although these lines of flux are invisible, the effects of magnetic fields can be made visible. For example, when a sheet of paper is placed on a magnet and iron filings are loosely scattered over the paper, the filings arrange themselves along the invisible lines of flux (Picture 2).


Picture 2: Magnetic Lines of Flux


Unlike Poles Attract


The polarities of magnetic fields affect the interaction between magnets. For example, when the opposite poles of two magnets are brought within range of each other, the lines of flux combine and pull the magnets together (Picture 3).


Picture 3: Unlike Poles Attract


Like Poles Repel


However, when like poles of two magnets are brought within range of each other, their lines of flux push the magnets apart (Picture 4). In summary, unlike poles attract and like poles repel. The attracting and repelling action of the magnetic fields is essential to the operation of AC motors, but AC motors use electromagnetism.


Picture 4: Like Poles Repel


Electromagnetism


When current flows through a conductor, it produces a magnetic field around the conductor. The strength of the magnetic field is proportional to the amount of current (Picture 5).


Picture 5: Electromagnetism


Left-Hand Rule for Conductors


The left-hand rule for conductors (Picture 6) demonstrates the relationship between the flow of electrons and the direction of the magnetic field created by this current. If a current carrying conductor is grasped with the left hand with the thumb pointing in the direction of electron flow, the fingers point in the direction of the magnetic lines of flux. The following illustration on Picture 7 shows that, when the electron flow is away from the viewer (as indicated by the plus sign), the lines of flux flow in a counterclockwise direction around the conductor. When the electron flow reverses and current flow is towards the viewer (as indicated by the dot), the lines of flux flow in a clockwise direction.


Picture 6: The left-hand rule for conductors


Picture 7: Magnetic flux direction


Electromagnet


An electromagnet can be made by winding a conductor into a coil and applying a DC voltage. The lines of flux, formed by current flow through the conductor, combine to produce a larger and stronger magnetic field. The center of the coil is known as the core. This simple electromagnet has an air core (Picture 8).


Picture 8: Electromagnet with air core


Adding an Iron Core


Iron conducts magnetic flux more easily than air. When an insulated conductor is wound around an iron core, a stronger magnetic field is produced for the same level of current (Picture 9).


Picture 9: Electromagnet with iron core


Number of Turns


The strength of the magnetic field created by the electromagnet can be increased further by increasing the number of turns in the coil. The greater the number of turns the stronger the magnetic field for the same level of current (Picture 10).


Picture 10: Magnetic field and number of turns


Changing Polarity


The magnetic field of an electromagnet has the same characteristics as a natural magnet, including a north and south pole. However, when the direction of current flow through the electromagnet changes, the polarity of the electromagnet changes. The polarity of an electromagnet connected to an AC source changes at the frequency of the AC source. This is demonstrated in the following illustration on Picture 11.


Picture 11: Changing polarity on electromagnet


At time 1, there is no current flow, and no magnetic field is produced. At time 2, current is flowing in a positive direction, and a magnetic field builds up around the electromagnet. Note that the south pole is on the top and the north pole is on the bottom. At time 3, current flow is at its peak positive value, and the strength of the electromagnetic field has also peaked. At time 4, current flow decreases, and the magnetic field begins to collapse.
At time 5, no current is flowing and no magnetic field is produced. At time 6, current is increasing in the negative direction. Note that the polarity of the electromagnetic field has changed. The north pole is now on the top, and the south pole is on the bottom. The negative half of the cycle continues through times 7 and 8, returning to zero at time 9. For a 60 Hz AC power supply, this process repeats 60 times a second.


Induced Voltage


In the previous examples, the coil was directly connected to a power supply. However, a voltage can be induced across a conductor by merely moving it through a magnetic field. This same effect is caused when a stationary conductor encounters a changing magnetic field. This electrical principle is critical to the operation of AC induction motors. In the following illustration on Picture 12, an electromagnet is connected to an AC power source. Another electromagnet is placed above it. The second electromagnet is in a separate circuit and there is no physical connection between the two circuits.


Picture 12: Induced voltage in electromagnets


This illustration (Picture 12) shows the build up of magnetic flux during the first quarter of the AC waveform. At time 1, voltage and current are zero in both circuits. At time 2, voltage and current are increasing in the bottom circuit. As magnetic field builds up in the bottom electromagnet, lines of flux from its magnetic field cut across the top electromagnet and induce a voltage across the electromagnet. This causes current to flow through the ammeter. At time 3, current flow has reached its peak in both circuits. As in the previous example, the magnetic field around each coil expands and collapses in each half cycle, and reverses polarity from one half cycle to another.


Electromagnetic Attraction


Note, however, that the polarity of the magnetic field induced in the top electromagnet is opposite the polarity of the magnetic field in the bottom electromagnet. Because opposite poles attract, the two electromagnets attract each other whenever flux has built up. If it were possible to move the bottom electromagnet, and the magnetic field was strong enough, the top electromagnet would be pulled along with it (Picture 13).


Picture 13: Electromagnetic Attraction

AC Motor Construction


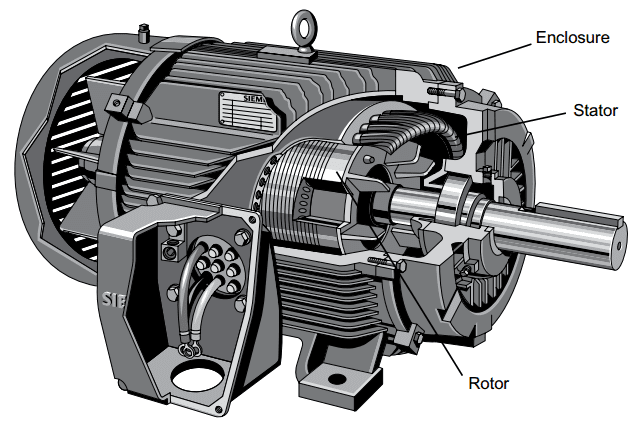
Three-phase AC induction motors are commonly used in industrial applications. This type of motor has three main parts: rotor, stator and enclosure (Picture 1). The stator and rotor do the work, and the enclosure protects the stator and rotor.


Picture 1: Main parts of AC motor: rotor, stator and enclosure

Stator Core


The stator is the stationary part of the motor’s electromagnetic circuit. The stator core is made up of many thin metal sheets, called laminations (Picture 2). Laminations are used to reduce energy loses that would result if a solid core were used.


Picture 2: Stator Lamination


Stator Windings


Stator laminations are stacked together forming a hollow cylinder. Coils of insulated wire are inserted into slots of the stator core. When the assembled motor is in operation, the stator windings (Picture 3 and Picture 4) are connected directly to the power source. Each grouping of coils, together with the steel core it surrounds, becomes an electromagnet when current is applied. Electromagnetism is the basic principle behind motor operation.


Picture 3: Stator Windings (Partially completed)


Picture 4: Stator Windings (Completed)


Rotor Construction


The rotor is the rotating part of the motor’s electromagnetic circuit (Picture 5). The most common type of rotor used in a three-phase induction motor is a squirrel cage rotor. The squirrel cage rotor is so called because its construction is reminiscent of the rotating exercise wheels found in some pet cages. A squirrel cage rotor core is made by stacking thin steel laminations to form a cylinder.


Picture 5: Rotor

Rather than using coils of wire as conductors, conductor bars are die cast into the slots evenly spaced around the cylinder. Most squirrel cage rotors are made by die casting aluminum to form the conductor bars. Manufacturers also makes motors with diecast copper rotor conductors. These motor exceed NEMA Premium efficiency standards. After die casting, rotor conductor bars are mechanically and electrically connected with end rings. The rotor is then pressed onto a steel shaft to form a rotor assembly (Picture 6).


Picture 6: Cutaway View of Rotor


Enclosure


The enclosure consists of a frame (or yoke) and two end brackets (or bearing housings). The stator is mounted inside the frame. The rotor fits inside the stator with a slight air gap separating it from the stator. There is no direct physical connection between the rotor and the stator (Picture 7).


Picture 7: Partially Assembled Motor


The enclosure protects the internal parts of the motor from water and other environmental elements. The degree of protection depends upon the type of enclosure. Bearings, mounted on the shaft, support the rotor and allow it to turn. Some motors, like the one shown in the following illustration, use a fan, also mounted on the rotor shaft, to cool the motor when the shaft is rotating (Picture 8).


Picture 8: Cutaway View of Motor